Terracotta Tile Cleaning

Welcome to my Work History archive where you will find detailed examples of the cleaning and renovation of Terracotta tiles carried out in Northamptonshire

Cleaning and Renovating Terracotta Tiles

Terracotta tiles have been around in certain parts of the world for over two millennia, in fact the word Terracotta means burned earth. The ancient Romans used a variety of terracotta tiles in their villas and palaces for many centuries. Terracotta tiles are thicker than most modern tiles giving them strength and durability.

The one big downside to Terracotta is the fact that it has no glaze on the surface and being very porous can soon pick up and store muck and dirt very quickly. If you have ever owned a Terracotta floor before you will be able to relate to this problem however the answer is to ensure you have the correct sealer in place.

Traditionally Wax was used to protect terracotta tiles however with the advent of modern purpose made sealers we don’t recommend it. Not only is it troublesome to remove but it scratches easily and we have seen situations in kitchens where dirt and oil trapped in the wax turns black and becomes very unsightly.

For sealing Terracotta we actually recommend Tile Doctor Seal and Go which works well on clay tiles such as Terracotta and is also water based so doesn’t give off a smell as it dries. When applying a sealer always make sure the floor is dry first as applying a sealer to a damp floor can lead to inconsistent results. Because of this we typically clean and seal Terracotta floors over two days so we can clean on day one and then apply the sealer on day two having let the floor dry off overnight.

Below you will find detailed examples of work we have carried out in the past, it should give you some idea of what’s involved and what can be achieved with the right techniques and products.


Terracotta Tiled Floor Renovation Towcester

Dirty Terracotta Floor Renovated in Towcester

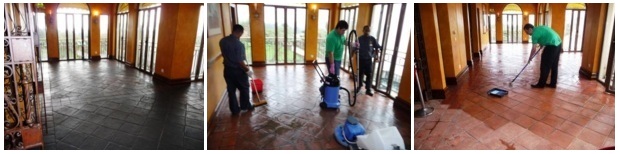
This Terracotta tiled floor was installed throughout the kitchen, diner, and hallway of a cottage in the village of Towcester. You can see from the photographs on this page that the floor had not been properly maintained, the grout lines had turned dark with ingrained dirt and the whole floor was now well overdue a renovation.

Terracotta Tiled Floor Before Cleaning Towcester

My client liked the floor and its character but as he was going to the expense of fitting a new kitchen he wanted to know if the floor could be restored to its former glory as his wife wanted a high shine finish and an easy to maintain floor.

Terracotta Tiled Floor Before Cleaning Towcester

Renovating the Terracotta and Grout would involve completely striping the floor of any previous sealants, deep cleaning the tiles and then applying a fresh seal. They were happy for me to do the work and it was agreed that the best time for this to be carried out would be after the old kitchen had been removed and before the new kitchen units were fitted. This would allow for a uniform wall to wall finish, and it would also make my work easier as I wouldn’t have to navigate around the kitchen units.

Cleaning a Terracotta Tiled Kitchen Floor

To get the floor clean and remove previous sealers and coatings I applied a strong dilution of Tile Doctor Pro-Clean. I had tried a few products on the tiles and had discovered after conducting a few tests that this had the right impact when it came to removing the many layers of old sealant. Tile Doctor Pro-Clean has an alkaline formula which makes it ideal for cleaning natural products such as Terracotta.

Terracotta Tiled Floor During Cleaning Towcester

The Pro-Clean was left to soak into the tiles for ten minutes and then scrubbed into the floor using a 17” rotary floor buffer fitted with a black scrubbing pad and running at slow speed to reduce splashing. This activity soon brought the dirt out of the tiles and the now soiled cleaning solution was removed using a wet vacuum. The floor was then rinsed down with water and the process repeated a couple of times until I was happy with the results.

Terracotta Tiled Floor During Cleaning Towcester

To clean up the grout a stiff grout brush was run along the grout lines in combination with more Pro-Clean. There were a few stubborn stains on the floor, and these were removed by spot cleaning the affected area with another product called Tile Doctor Remove and Go employed with a steamer to lift the stain out of the clay tile.

Terracotta Tiled Floor During Cleaning Towcester

Once happy the floor was clean, the floor was given an acid wash using a using a 10:1 dilution of Tile Doctor Grout Clean-up. This final step in the cleaning produce removes old grout smears, alkaline salts that can lead to efflorescence and will neutralise the use of alkaline cleaning products used earlier.

Sealing Terracotta Tiles in Towcester

After more rinsing with water and extraction with the wet vacuum the floor was left to dry for four days before returning to seal the Terracotta. To achieve the desired glossy finish the Terracotta was sealed using Tile Doctor Seal and Go which is an ideal sealer for Terracotta and provides durable stain protection together with a silk finish. The more coats you apply the higher shine finish you are able to achieve depending on the porosity of the tile and in this case seven coats were applied.

Terracotta Tiled Floor During Sealing Towcester

The client was extremely impressed with the results achieved in the kitchen, diner and hallway and left the following 5-star feedback.

“Phil has done an absolutely outstanding job on our terracotta floor tiles. Made them look like new. Wonderful outcome. His attention to detail and professionalism are of an excellent standard. It was a pleasure to do business with Phil and we will definitely be calling on his services again in the future. He is a really nice bloke too. Thanks again Phil.”

Terracotta Tiled Floor After Sealing Towcester


Professional Restoration of a Terracotta Tiled Kitchen in Northamptonshire

Dirty Terracotta Floor Renovated in Towcester Read More »

Terracotta Tiled Floor Before After Renovation Flore Village

Terracotta Floor Renovation Prior to Kitchen Installation at Flore Village

The following photos are of a Terracotta floor restoration I carried out in the picturesque village of Flore, situated between Northampton and Daventry. I was asked to assess the potential of the Terracotta floor in an old cottage, the clients had always liked the floor but didn’t want the bad condition of the tiles to detract from the effect of the beautiful new kitchen they were planning to install. They needed reassuring that it would be possible to restore the floor to a good standard and thereby enhance the final look of the new kitchen before they went to the expense of replacing the entire floor.

Whilst I was there, I carried out a test clean to a small area of floor, stripping off all old the sealers to expose the natural blemish free face of the tile. Having worked out a process for restoring the floor I was also able to come up with an accurate price for completing the floor. I left the quote with the customer and was pleased to hear back from them a few days later to let me know they had decided to go ahead with the restoration of their floor.

Terracotta Tiled Floor Before Restoration Flore Village Terracotta Tiled Floor During Restoration Flore Village Terracotta Tiled Floor After Restoration Flore Village

Before being able to set a date for my return I had to liaise with for the kitchen company to agree a date them to come and remove the old kitchen and install the new. I would slot in-between the two dates.

Stripping Terracotta Kitchen Floor Tiles

When returned to the do the work the kitchen had been stripped out as promised and with no kitchen units etc. to protect from splashing, I was able to get straight on with the cleaning of the floor using Tile Doctor Oxy-Pro alkaline tile cleaner.

Terracotta Tiled Floor During Restoration Flore Village

Oxy-Pro is a gel and doesn’t require a lot of water to activate it, my concern was Terracotta tiles are very porous and it helps the drying process if you keep the moisture down to a minimum, especially as this work was carried out in November. The product was scrubbed into the Terracotta tiles using a stiff brush tool attached to rotary machine. I also used grout brushes on the wide grout lines working in small sections at a time and clearing the resulting slurry with a wet vacuum as I went.

Terracotta Tiled Floor During Restoration Flore Village

Once the cleaning process was completed across all the Terracotta, I spot treated the many stubborn stains with Tile Doctor Acid Gel, especially along the grout lines. This was brushed in, left to dwell, scrubbed and then removed with a wet vacuum. The stone was then mopped with plain water to neutralise and remove any trace of cleaning products. I then installed a fan to dry the entire area as quickly as possible.

Terracotta Tiled Floor During Restoration Flore Village

Sealing Terracotta Floor Tiles

As the customer was not using the kitchen it provided time to leave the floor for a few days to fully dry out with a small dehumidifier left on site to assist with the drying process. I returned later to seal the floor and started by taking a damp meter reading so I could be sure the Terracotta was completely dry.

Terracotta Tiled Floor During Restoration Flore Village

The results were good, and I was able to go ahead and seal the Terracotta using several coats of Tile Doctor Seal & Go Extra for a silk finish. Once of the reasons I picked this sealer is its breathable so it will cope with any moisture rising through the tile from the subfloor which is an important consideration on old floors which have no damp proof course.

Terracotta Tiled Floor After Restoration Flore Village

Although I never got to see the new kitchen installed my customer was very pleased with the transformation of the floor and left the following testimonial on the Tile Doctor feedback system.

Philip did a fantastic job restoring the terracotta tiles in our kitchen. They are good as new! Philip was hardworking and excellent at communicating with us and planning the best time to do the work around our new kitchen being fitted. Highly recommend! Ayesha D.

Terracotta Tiled Floor After Restoration Flore Village


Professional Restoration of a Terracotta Tiled Kitchen Floor in Northamptonshire

Terracotta Floor Renovation Prior to Kitchen Installation at Flore Village Read More »

Kitchen Terracotta Floor Before After Renovation Moulton

Cleaning a Terracotta Tiled Kitchen Floor in Moulton

We were contacted by the owner of a property in Moulton with a problematic Terracotta tiled kitchen floor. She was seriously considering ripping up the entire area of tiling and replacing it as she was having a new kitchen installed. Both her and her husband were concerned that unless I could restore this floor to somewhere near to its original condition, they would need to replace it.

Terracotta Tiled Kitchen Floor Before Restoration Moulton

I went over to inspect the Terracotta tiles and could see the entire surface was deeply ingrained with soiling and the grout lines were filthy. After carrying out a test it became obvious that the previous sealer had been applied very sparingly and had mostly worn away, leaving the stone prone to staining. Terracotta is a very porous tile and dirt had become ingrained in the pores leaving it looking very dull and difficult to clean.

Terracotta Tiled Kitchen Floor Before Restoration Moulton

I completed the test on a small part of the floor and the customer could see the results which could be achieved. Happy with the result they agreed my quote and we set a date for my return to complete the floor.

Cleaning a Terracotta Tiled Kitchen Floor

The tiles turned out to be made of a fairly soft Terracotta which meant that we were able to deep clean them extremely effectively using a strong dilution of Tile Doctor Pro-Clean. We used Tile Doctor Remove and Go in particularly stubborn areas.

The process I use is to spray the Pro-Clean onto the floor and leave it to soak in for about ten minutes before being worked in using a heavy rotary machine fitted with a black scrubbing pad. The resulting slurry is removed using a wet pick up vacuum. All the dirt and virtually all of the old sealer was removed at this stage; the remaining patches around the edges of the area being finished by hand with a 200-grit burnishing block. The grout lines were then cleaned by hand with an angled grout brush.

Terracotta Tiled Kitchen Floor During Restoration Moulton Terracotta Tiled Kitchen Floor During Restoration Moulton

Finally, the deep-seated oil stains in front of the cooker were brought out using Tile Doctor Oxy-Gel which was left to dwell on the marks for an hour before being agitated with a diamond burnishing pad and rinsed away with a wet pick up machine. The floor was rinsed with water and allowed to dry off overnight.

Terracotta Tiled Kitchen Floor During Restoration Moulton

Sealing a Terracotta Tiled Kitchen Floor

The following day I inspected the floor and checked it was ready to be sealed. All was well so I applied an initial coat of Tile Doctor Colour Grow which is an impregnating sealer that occupies the pores in the tile enhancing the natural colours of the Terracotta and provide a base layer of protection from staining.

Terracotta Tiled Kitchen Floor After Restoration Moulton

I returned at a convenient time once the kitchen was completely installed to finish the job. This involves carrying out a light maintenance clean with Tile Doctor Neutral Cleaner and once the floor was dry, I applied 5 further coats of Tile Doctor Seal and Go which provides a pleasing satin finish which is really suited to this type of floor.

Terracotta Tiled Kitchen Floor After Restoration Moulton

The customer was very happy with the results and has left the following feedback.

“We were really pleased with the results, thank you!”

Terracotta Tiled Kitchen Floor After Restoration Moulton


Professional Restoration of a Terracotta Floor in Northamptonshire

Cleaning a Terracotta Tiled Kitchen Floor in Moulton Read More »

Terracotta Tiles Before After Deep Cleaning and Sealing Maidford

Terracotta Tiled Kitchen Floor Renovated at a Maidford Cottage

This Terracotta tiled floor was installed in the kitchen of a cottage in the small village of Maidford near Towcester. The tiles were not looking their best and the owner of the property realised it was time to do something about it and contacted Tile Doctor to have the floor stripped and resealed. Stripping and Sealing tile and stone floors is our bread and butter so I was more than happy to pop round and survey the floor which was approximately 9m2.

The grout had darkened with dirt and the previous tile sealer was failing so dirt was now getting ingrained in the Terracotta making it difficult to clean in places and leading to a patchy appearance. We discussed the work involved, my quote was accepted, and a date agreed for me to return and complete the work which would take two days, one to clean and one to seal.

Terracotta Tiled Kitchen Floor Before Cleaning Maidford

Stripping Terracotta Kitchen Floor Tiles

After tidying up the Kitchen and removing the kickboards from underneath the kitchen units I set about working on cleaning and stripping the Terracotta floor of old sealers. To start I tested a small area with a strong dilution of Tile Doctor Wax Away. Wax was quite often used on Terracotta so I figured this product would be a good place to start. My suspicions were proved correct, and I found this to be the best product for removing the many layers of sealant on the floor. Wax Away is a new alkaline product by Tile Doctor and ideal for cleaning clay-based tiles such as Terracotta.

Terracotta Tiled Kitchen Floor During Cleaning Maidford

With my sights set on the rest of the floor Wax Away was scrubbed into the tile using a 17” rotary floor scrubbing machine and a black scrubbing pad running on a slow speed which helps to reduce splashing. This activity soon brought the dirt off the floor and the soiled cleaning solution was removed using a wet vacuum and the floor was rinsed down with clean water. The cleaning process was repeated a couple of times until I was happy with the floor, a stiff hand brush was then used along the grout lines with a dilution of Tile Doctor Pro-Clean to clean up the grout.

Terracotta Tiled Kitchen Floor During Cleaning Maidford

After rinsing and extracting the floor again the floor was inspected, and I noticed there were a few stubborn paint splashes on the tiles. I managed to remove these and these by spot treating the affected area with Tile Doctor Remove and Go and a steamer to lift the stain out of the clay tile. Once happy the floor was clean it was given a thorough rinse to neutralise it and remove any trace of cleaning products and then left it to dry.

Terracotta Tiled Kitchen Floor After Cleaning Maidford

Sealing Terracotta Floor Tiles

I allowed the floor to dry for several days before returning to seal the Terracotta using numerous coats of Tile Doctor Seal and Go which is an ideal sealer for Terracotta and provides durable stain protection together with a low sheen finish. Terracotta is by its nature very porous and so it’s not unknown for it to take up to nine coats of sealer, which can take some time to apply as like paint you have to wait until it’s dry before it will take the next coat.

Terracotta Tiled Kitchen Floor During Sealing Maidford

The customer was so impressed by the results I achieved in their kitchen they decided to go ahead and book me in to carry out this process throughout the whole of the ground floor which included lounge, study and hallway.

Terracotta Tiled Kitchen Floor After Sealing Maidford


Renovating a Terracotta Tiled Kitchen Floor in Northamptonshire

Terracotta Tiled Kitchen Floor Renovated at a Maidford Cottage Read More »

terracotta tiles before and after grout haze removal in cogenhoe

Terracotta Tiled Kitchen Floor with Severe Grout Haze Problem Treated in Cogenhoe

This newly installed Herringbone-style Terracotta tiled floor in a refurbished kitchen was heavily covered with patches of grout haze. The customer, who lives in the town of Cogenhoe, Northampton informed me that the tiler had supposedly sealed the floor before grouting. If this was true, the grout haze should have been very easy to remove.

However, the tiler had clearly not been entirely truthful as, when I arrived at the property to carry out a test clean, I found very little evidence of any sealer whatsoever. Nonetheless, I found that the grout haze was easily removed using a solution of Tile Doctor Grout Clean Up, a concentrated phosphoric acid cleaner which is designed specifically for the removal of haze, mineral deposits and efflorescence.

Herringbone design terracotta floor before Cogenhoe Herringbone design terracotta floor before Cogenhoe

These Terracotta tiles were very pitted and the original tiler was correct to fill the small holes with grout to complement the rustic look of the tiles, but he should have taken the correct measures to ensure that a white misty grout haze didn’t appear over the whole area!

The customer was happy for me to proceed with restoring the floor, but also very concerned that her newly installed hand painted kitchen units would be damaged by the chemical cleaning products. I assured her that I would cover them up completely and carry out all work along the plinths by hand.

Removing Grout Haze from Terracotta Tiles

Once on site, I covered the kitchen units to protect them and proceeded to mix up a solution of Grout Clean Up. This was applied firstly around the edges of the floor and scrubbed into the stone by hand using a stiff brush.

Working in areas of four square metres each so as to not the leave the product on the floor too long, I applied the solution to pre-wet the floor ready for the next part of the process. This was to apply Tile Doctor Acid Gel, our blend of phosphoric and hydrochloric acids, leave it to dwell for a few minutes has then agitate it to neutralise and remove the copious grout haze. Once each area had been treated I rinsed it with water to remove any chemicals.

Herringbone design terracotta floor during Cogenhoe Herringbone design terracotta floor during Cogenhoe

Sealing Terracotta Tiles

With the entire floor treated, I installed a dehumidifier to help the tiles to dry quickly overnight. The next day I returned to the property to apply two coats of Tile Doctor Colour Grow sealer. This is an impregnating sealer which provides robust protection while also lifting the natural shades in the Terracotta.

Each coat was polished in by hand, leaving an hour for drying between coats. I then waited another hour before giving the whole floor a final polish with a buffing machine to remove any excess sealant.

Herringbone design terracotta floor after Cogenhoe Herringbone design terracotta floor after Cogenhoe

The result achieved in the space of 24 hours was fantastic and the customer was exceptionally pleased. Despite the severity of the grout haze problem, the combination of the right products allowed me to handily resolve it. The addition of a properly applied and top quality sealer will help to ensure the floor is protected from staining, something which is essential in a kitchen.

Resolving Installation Issues with a newly installed Terracotta Tiled Floor in Northamptonshire

Terracotta Tiled Kitchen Floor with Severe Grout Haze Problem Treated in Cogenhoe Read More »

Terracotta tiles Cleaned and Sealed in Holcot Village

Kitchen Terracotta Tile Cleaning and Sealing in Holcot

The photographs below show a Terracotta Tiled floor we maintained that was installed in the kitchen and conservatory of a house in the Northamptonshire village of Holcot. The tile and grout was in good physical condition but had become ingrained with dirt and were now in need of a deep clean and reseal.

Terracotta tiles Before Cleaning in Holcot Village

Cleaning Terracotta Tiles

First job was to protect the kitchen units, doors and skirting boards during the cleaning process for which I used blue plastic sheeting. Next a strong dilution of Tile Doctor Pro-Clean which is an industrial strength alkaline cleaning product that’s safe to use on tile and stone was applied to the floor using a mop. The solution was left it to dwell on the floor for twenty minutes in order for it to soak into the tile and get to work on the dirt. It was then worked into the floor using a rotary machine fitted with a black scrubbing pad and stiff hand brushes were along the grout lines where the pad struggled to reach.

The soiled solution was picked up using our large wet and dry vacuum and the floor was then rinsed with clean water to neutralise the tile and allow us to see which areas need further attention. The process was repeated until I was happy that any old sealer and all the dirt had been removed and then the floor was given a final rinse, wet vacuum and then left to dry overnight ready for sealing the next day.

Terracotta tiles Being Cleaned in Holcot Village

Sealing Terracotta Tiles

When I returned the next day I checked the floor had dried using a damp meter which it was and so proceeded to seal the Terracotta tiles with seven coats of Tile Doctor Seal and Go which will protect the tiles from staining and also add a nice subtle shine to the floor. Terracotta is a clay based product and so naturally quite porous.

Terracotta tiles Cleaned and Sealed in Holcot Village
 

Terracotta Tile Maintenance in a Holcot Kitchen

Kitchen Terracotta Tile Cleaning and Sealing in Holcot Read More »

=================================

Northamptonshire Tile Doctor

================================= Read More »

Scroll to Top