Acid Wash

Grout Haze Removed From Porcelain Floor Tiles Northampton

Removing Polymer Grout Haze following Porcelain Floor Installation in Northampton

This client from Northampton called contact me about their newly installed Porcelain tiles which appeared to be much darker than they remembered from in the shop. They were disappointed with their appearance and so I agreed a time to pop round, diagnose the issues and come up with a solution.

Grout Haze Before Removal From Porcelain Floor Tiles Northampton

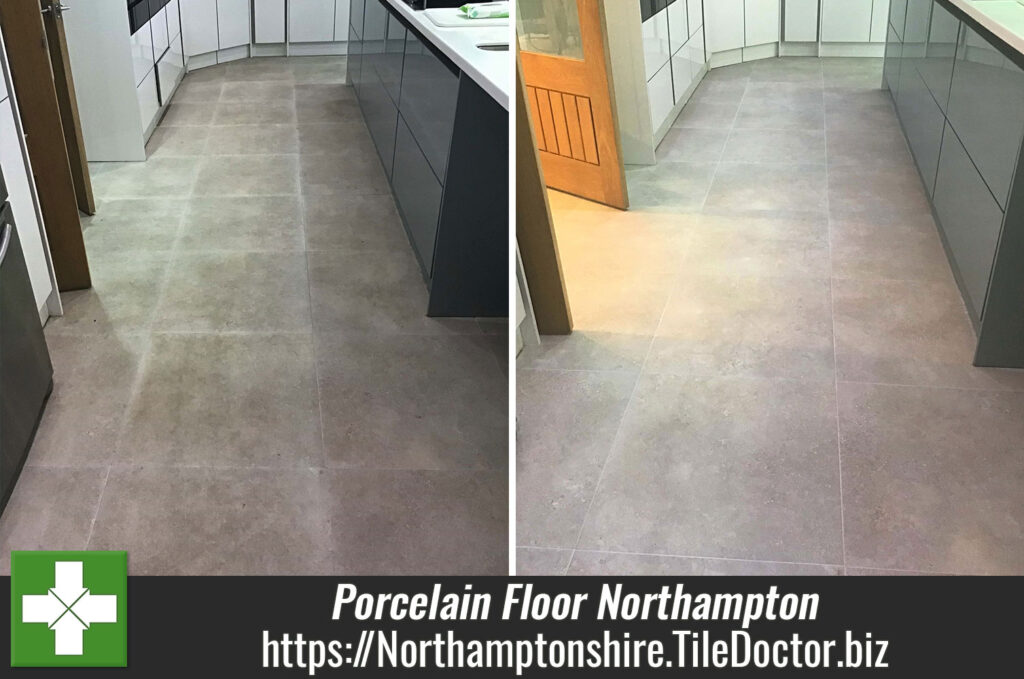
Once at the property I quickly established after testing a couple of tiles that there was grout haze over the entire area from installation. This happens when the grout starts to dry on the tile before it is cleaned and fully rinsed off. This problem was compounded by the customer vigorously mopping the floor with several different products trying to resolve this issue themselves and the product building up and attracting more soil to the areas, therefore darkening it further.

Grout Haze Before Removal From Porcelain Floor Tiles Northampton

The test clean I conducted removed the grout haze to reveal the tile they had been originally expecting. Impressed with the results from the test they asked me to repeat the process on the whole floor which included the kitchen and adjoining dining area. I worked out a quote which was agreed and a date scheduled for my return.

Removing Grout Haze from a Porcelain Tiled Floor

Fortunately, the owner knew which grouting product was used when laying the floor, this was very useful as polymer-based grouts need a different approach to traditional grouts. As it turns out it was a polymer-based grout which makes sense as they are known to set faster and cause this problem as a result.

The process I used was to apply Tile Doctor Remove and Go to a workable section of the floor which was approximately 8m2. The solution was allowed to dwell for ten minutes or so prior to agitating with a rotary brush machine. This area was then rinsed off with water and a wet and dry pick-up machine. This process is used to break down the polymers in the grout but does not fully remove the haze from the tiles, that is covered in the next section.

Part two of treating the grout haze involves the application of Tile Doctor Grout Clean-Up to the tile and allowing it to dwell for a further ten minutes, a black buffing pad is then used with the rotary machine to scrub the product into the Porcelain tile. As before the soiled solution is removed with another rinse and extracted with the wet and dry pick-up machine.

Once that was done, I inspected the floor to ensure all the grout haze has been removed and repeated the 2nd stage process where required.

Sealing a Porcelain Tiled Floor

I allowed the floors to dry off overnight and returned the following day to apply Tile Doctor Ultra Seal Sealant over all the areas, this is especially good for protecting the grout lines from staining.

Grout Haze After Removal From Porcelain Floor Tiles Northampton

Given the dark colour of the Porcelain tiles it’s difficult to appreciate the improvement from the photographs, my customer was extremely happy with the result though and left the following glowing review:

“Fabulous service from Phil and great results really really pleased. Lovely man and very hard working. Thank you”

Before leaving I made sure to discuss aftercare cleaning, which for this floor I recommend using Tile Doctor pH Neutral Tile Cleaner which is a gentle but effective cleaning product designed for use on sealed tile and stone.

Grout Haze After Removal From Porcelain Floor Tiles Northampton


Porcelain Tile Cleaning in Northamptonshire

Removing Polymer Grout Haze following Porcelain Floor Installation in Northampton Read More »

Victorian Hallway Tiles Before After Restoration Wellingborough

Restorative Cleaning of Victorian Hallway Tiles in Wellingborough

I recently visited a property in Wellingborough to survey their Victorian Hallway floor and work out the best method and products to restore it. The tiles were extremely dirty as the sealant had worn off allowing dirt to become ingrained. They had not been maintained for many years and there was evidence of adhesive which was due to a carpet being stuck down at some point in the past.

Victorian Tiled Hallway Floor Wellingborough Before Restoration

To restore the Victorian floor, I would need to remove the glue and give the tiles a professional deep clean to extract the years of ground-in dirt and staining. Following this the tiles would need sealing in order to protect them going forward. After discussing the work in detail with the owner I sent over a quotation by email which was accepted, and a date arranged for work to commence.

Victorian Tiled Hallway Floor Wellingborough Before Restoration

Restorative Cleaning of Victorian Hallway Tiles

On my return I applied a cocktail of Tile Doctor Oxy-Gel and Tile Doctor Nano-Tech HBU to the tiles. This creates a strong cleaning/coatings remover that would soften the embedded soiling and glue making it easier to remove. I left this to dwell on the floor for about an hour so it could break down the soil and adhesive. I then fitted a coarse 100-grit diamond pad to a rotary floor buffer and scrubbed the floor vacuuming up the resulting residue as I went along working in small sections of 2/3 metres at a time. I then repeated the process using a 200-grit pad, rinsing and extracting afterwards with water to remove the fine slurry this process generates.

Old floors like these were laid before the invention of the damp proof membrane which can result in moisture rising through the floor as it evaporates potentially leaving alkaline salt deposits on the surface. This process is known as Efflorescence and although I minimised the use of water during the cleaning process, I was concerned that this may still present a problem later. To neutralise any alkaline salts in the floor that could cause this problem my last action for the day was give the floor an acid wash using Tile Doctor Acid Gel.

Once this was done and extracted from the floor, I followed up with a further clean using Tile Doctor pH Neutral Tile Cleaner which was applied with a microfibre cloth. I left the floor to dry off overnight so it could be sealed the next day.

Sealing Restored Victorian Hallway Tiles

On day two I used a damp meter to check the moisture levels in the floor to ensure it had dried overnight. The results were good, so I set about applying the sealer. For this floor I decided to go with three coats of Tile Doctor Colour Grow which is an impregnating sealer that as well as protecting the Victorian tiles form staining also enhances the colours in the tile. This sealer is also fully breathable so any moisture will be able to evaporate up through the tile and not get trapped under the floor where it could cause problems.

Victorian Tiled Hallway Floor Wellingborough After Restoration

Before leaving I also discussed maintenance cleaning with the customer and left them a bottle of Tile Doctor Neutral Tile Cleaner which is safe to use on sealed floors and will help keep the tiles looking at their best. It’s supplied in concentrated form so it should last them some time before they run out. The customer was very happy with the end results and has left positive comments on our website.

Very happy with the restoration of my Victorian tiled floor, cleaned, sealed and polished bringing it back to life. Phil was prompt to get back to me with any aftercare questions/queries/visits. Paula B, Wellingborough

Victorian Tiled Hallway Floor Wellingborough After Restoration


Victorian Hallway Tile Restoration in Northamptonshire

Restorative Cleaning of Victorian Hallway Tiles in Wellingborough Read More »

Scroll to Top