hallway

Mosaic Tiled Edwardian Floor Cleaning Abington Park

Cleaning 100 Year Old Mosaic Tiles in Abington Park

My customer recently got in touch and requested a site visit to look at her hallway floor.
The Edwardian property was situated in the Abington Park part of Northampton which is an area is steeped in history, with the nearby Manor House said to have been the home of William Shakespeare’s daughter Elizabeth Bernard. The house has since been turned into a museum.

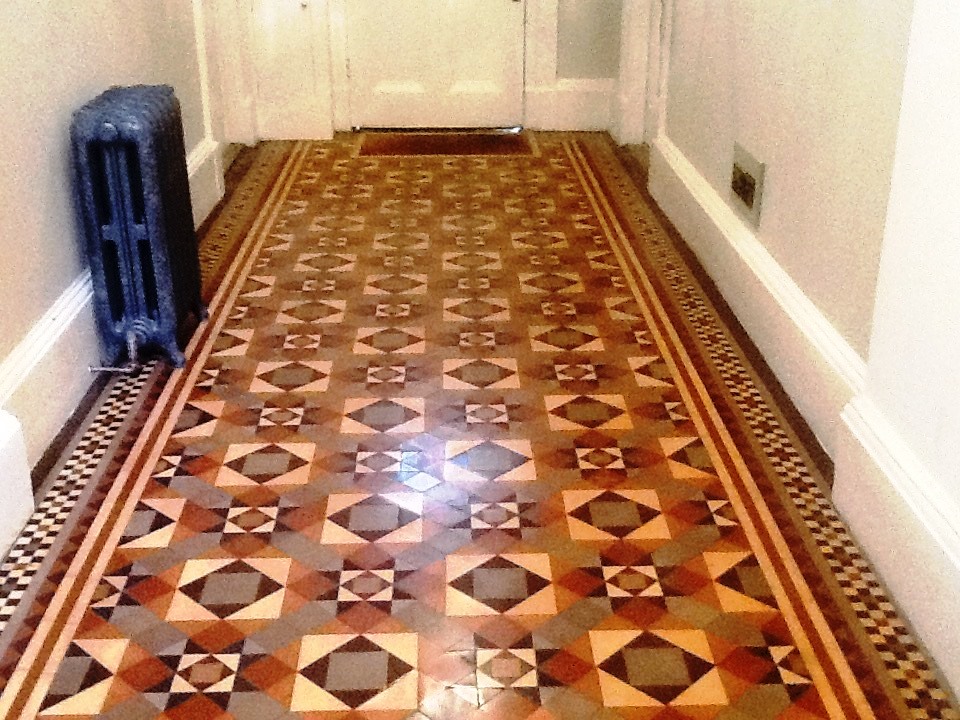
As you can see from the photos, the floor which was laid when the house was built over 100 years ago using small square brown and beige mosaic tiles in a repeating. Although in good physical condition for its age the floor was looking a little tired and had lost its lustre and vibrant colour. The hallway also had stained wood panelling on one side which was another original feature and the owner of the property was keen to maintain the period feel.

Edwardian Mosaic Tiled Hallway Floor Before Cleaning Abington Park

I discussed with the customer what we could do to restore the floor, explaining the process, timescale and of course the cost. She was happy to go ahead so we scheduled the work in without delay.

Edwardian Mosaic Tiled Hallway Floor Before Cleaning Abington Park

Cleaning an Edwardian Mosaic Tiled Hallway Floor

In order to protect the wall panels and keep the moisture in the floor to a minimum I decided to keep the use of cleaning products to a minimum. This is always a concern with these old floors which have no damp proof membrane as the use of too much water can lead to efflorescence salts appearing later. With this in mid I decided to clean the floor using Tile Doctor burnishing pads as these pads only require a small amount of water and no products, this would also have the benefit of slightly levelling out the surface of the tiles.

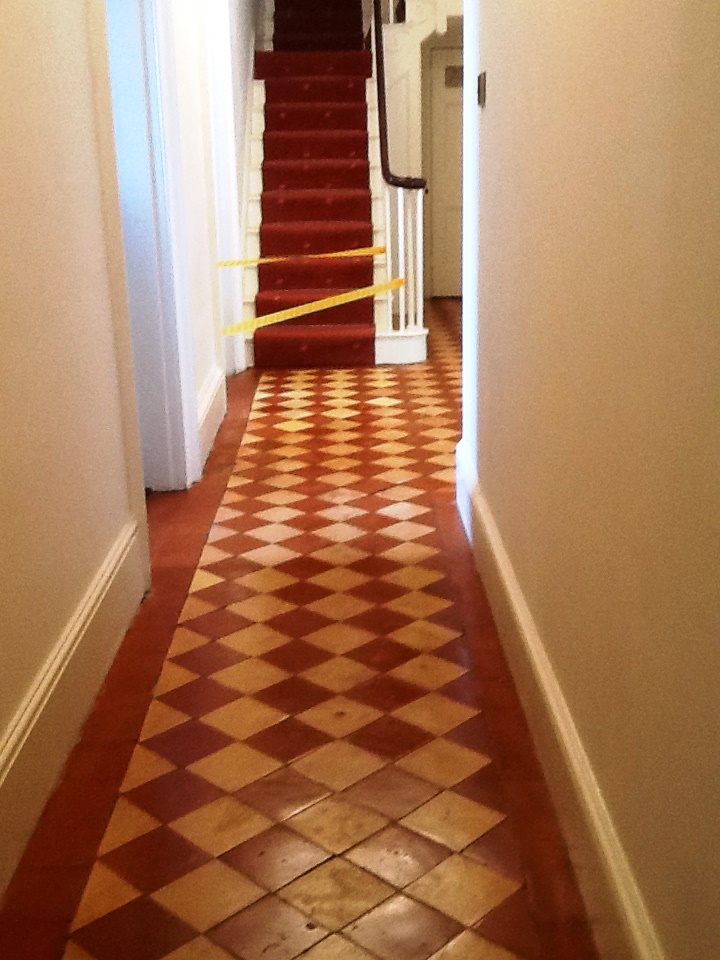
My first course of action was to vacuum the floor to ensure there was no loose debris followed by masking up the bottom of the stairs carpet to protect it. I then started the restoration process by using a coarse 100-grit Tile Doctor burnishing pad attached to a 17” industrial rotary machine and a small amount of water to lubricate the process. The 100-grit pad is quite an aggressive pad which removes deeply imbedded stains and as mentioned before a small amount of unevenness. To remove the resultant slurry the floor was rinsed with a small amount of water which was then extracted using a wet pick up machine. This process was then repeated with a 200-grit burnishing pad to smooth out any scratches and polish the tile ready for sealing.

Although it was a relatively small area, 12 square metres this process took the whole day as we work in small sections at a time. Moving the machine slowly with multiple passes over each area.

Sealing an Edwardian Tiled Hallway Floor

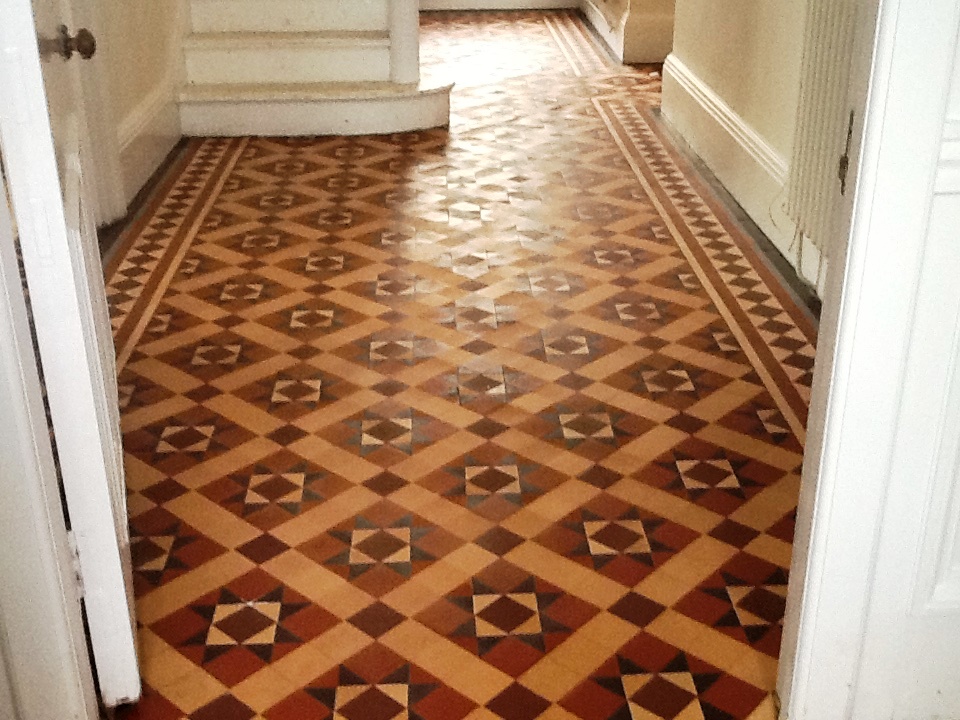
I returned the following day and assessed the floor to ensure we were happy with the result from the previous days cleaning. I also took damp meter readings and was pleased to see they were within normal expectations for a floor of this age. Next, I applied Tile Doctor Colour Grow Sealant which is a breathable sealant that will allow any moisture in the sub floor to rise though the tile. This particular sealer is a colour enhancing sealer that protects and improves the natural colours in the tile and leaves a lovely natural finish. The floor now has a much more even finish and will be much easier for the client to maintain in the future.

Edwardian Mosaic Tiled Hallway Floor After Cleaning Abington Park

The customer was very happy with the results and left the following feedback on the Tile Doctor feedback system.

“Great communication about the work planned and quotation. A super job in bringing my Edwardian mosaic tiled floor back to life. Would highly recommend this service”
Karen M”

Edwardian Mosaic Tiled Hallway Floor After Cleaning Abington Park


Professional Restoration of Mosaic Hallway Tiles in Northamptonshire

Cleaning 100 Year Old Mosaic Tiles in Abington Park Read More »

Scratched Victorian Hallway Tiles Before After Renovation Rushden

Removing Wax Scratches from Victorian Hallway Tiles in Rushden

This customer called me as she was concerned about the scratches on her hallway tiles, they were not only unsightly but were also starting to trap dirt. The Victorian property in Rushden which lies between Bedford and Kettering on the east side of Northamptonshire.

We always offer a site visit to take a look at the job before doing any work, that way we can discuss what the cleaning options are, and it also demonstrates to the customer that we know what we’re talking about.

The hallway floor was a lovely and intricate example of Victorian tile installation and I could see that overall it was in good condition for its age. On closer inspection the customer was relieved to find out that it was the old wax sealant breaking down and not actually scratches on the tiles. I carried out a test on a small area to ascertain how difficult it would be to remove this wax. I realised I would be able to use Tile Doctors new product for the removal of the wax sealant, Tile Doctor Wax Away which is a fast and effective formula that is designed just for this type of job, it offers safe removal of wax and polish from tile and natural stone. We agreed the quote and the work was booked in for the following month.

Victorian Tiled Hallway Floor Before Wax Removal Rushden

Cleaning/Repairing a Victorian Tiled Hallway Floor

On our return we started to remove the wax coating using the Tile Doctor Wax Away product. It was applied neat and left to dwell for ten to fifteen minutes before working it into the floor with a small amount of water and a black stripping pad attached to a rotary machine. The resulting slurry was then removed using a wet vacuum. The floor was then inspected, and I decided to repeat this process with a hand brush in a couple of small areas and around the edges to ensure the old wax sealant was fully removed in these stubborn areas. The floor was then rinsed with water to remove any remaining slurry and trace of cleaning product and the wet vacuum was used to dry the floor again.

Victorian Tiled Hallway Floor During Wax Removal Rushden

My next course of action was to run over the floor with a 400-grit burnishing pad to remove imbedded dirt and stains from the tiles, this was followed by a second rinse with water. After removing the water with wet vacuum, the floor was then left to dry out fully for a few days aided by a large fan that I left on site. It’s important that the tiles are fully dry before applying a sealer and this is even more important on older floors where no damp proof membrane has been installed.

Sealing a Victorian Tiled Hallway Floor

I returned three days later and started by giving the floor a light vacuum and clean. I also took damp meter readings to check the floor was fully dry. Once I was satisfied I started to apply 2 coats of Tile Doctor Colour Grow Sealant, this is a breathable sealant which will allow the tiles to breath and allow moisture vapour from the sub floor to rise through the tiles which is important in these old houses where no damp proof membrane exists. Colour Grow is an impregnating sealer that works by occupying the pores in the tile thus preventing dirt from becoming ingrained there, the sealant enhances the natural colours in the tile and dries to a lovely natural matt finish.

Victorian Tiled Hallway Floor After Cleaning Rushden

Once finished the floor looked great and the customer was hugely relieved that the tiles could be restored easily and cost effectively, she had thought the damage may have been irreversible. Moving forward it will now be easier for her to maintain and keep clean. The floor is now back to its’ true self and properly in keeping with the rest of the period features in the house.

Victorian Tiled Hallway Floor After Cleaning Rushden


Professional Restoration of a Victorian Tiled Hallway in Northamptonshire

Removing Wax Scratches from Victorian Hallway Tiles in Rushden Read More »

Honed Limestone Floor Before and After Restoration Upper Boddington

Honed Limestone Kitchen Floor Restoration – Upper Boddington, Daventry

The following photos show a recent job we undertook at a timber framed house in the village of Upper Boddington, just south of Daventry. The client was having a new kitchen installed but didn’t want to replace the floor as it was generally in good condition, just dull with some staining and general wear and tear.

As the photos show the kitchen units had already been removed and as the tiles were wall to wall this was an ideal time to have this work carried out as the kitchen was being reconfigured and the customer wanted the floor to look uniform throughout, we also included the hallway in the cleaning process.

Honed Limestone Floor Before Restoration Upper Boddington

Burnishing and Cleaning Polished Limestone Tiles

With tiles made of Limestone, Travertine, Marble and other high quality polished stone, we find that the best way to restore appearance is through a process known as burnishing and in the before photo you will see the specialised grinding and polishing equipment we use to achieve brilliant results and a professional finish.

Honed Limestone Floor Before Restoration Upper Boddington
As the tiles were worn and stained in the high traffic areas we applied Tile Doctor Pro-Clean which had been diluted and decanted into a pump-up sprayer. After leaving it to soak in for ten minutes it was scrubbed into the tile and grout using a rotary floor machine and a stiff brush. This was followed by washing and rinsing of floors with water and extracting the soil with a wet vacuum.

The next step was to apply a full set of Tile Doctor Stone Burnishing pads from 200 grit, 400 grit, 800 grit and finishing with 1500 grit for a honed look. We worked through the pads in 10 metre sections at a time lubricating with water and rinsing with water between each pad.

The kitchen and hallway floors were then allowed to dry out fully overnight.

Sealing Polished Limestone Tiles

The next day I returned to the property and completed the polishing process by applying the very fine 3000 grit burnishing pad with a little water and leaves a high shine finish.

The floor was then sealed with three coats of Tile Doctor Ultra Seal, which is a premium, natural look, impregnating sealer designed to provide maximum stain protection without altering the colour of the stone. The sealer takes an hour to dry and with three coats to apply it took most of the day to finish.

Honed Limestone Floor After Restoration Upper Boddington
The customer was happy with the results and left the following 5-star review on our site.

“Superb Service Chris P, Daventry”

Honed Limestone Floor After Restoration Upper Boddington
 

Professional Cleaning, Polishing and Sealing of a Honed Limestone Floor in Northamptonshire

Honed Limestone Kitchen Floor Restoration – Upper Boddington, Daventry Read More »

Pitted Travertine Before and After Filled Polished Rushden

Pitted Travertine Floor Tiles Filled and Polished in Rushden

Not only do we carry out the deep cleaning and restoration of all types of natural stone, we can also carry out repairs such as the filling of holes in stone, whether it be limestone, marble or as in this case Travertine. Travertine in particular is prone to a natural process of erosion know as pitting, this results in holes developing that easily fill up with dirt and muck over time and can be a real problem to maintain.

Pitted Travertine Before Filled Polished Rushden
This customer in Rushden called me in, as he felt the floor hadn’t been properly maintained since it had been installed twelve years prior and he was becoming concerned about the number of holes and pits that were appearing in the high traffic areas. The Travertine tiles had been laid in the hallway, kitchen and upstairs bathroom of the property but the problem was most apparent in the Kitchen.

Pitted Travertine Before Filled Polished Rushden

Burnishing and Cleaning a Travertine Tiled Floor

To get the floors clean and restore the polished appearance of the Travertine I decided to apply a set of Tile Doctor diamond encrusted burnishing pads. The process involves the application of four different pads applied in sequence from coarse to very fine, rinsing in-between each pad to remove dirt. As the floor had been installed in the Kitchen and the Hallway it made sense to split the work into two parts and work on each area separately.

The first pad is a coarse 400 grit pad that is attached to a rotary machine running at slow speed and with only water for lubrication. The pad is applied to the stone to removes minor scratches, sealers and dirt. It’s run over the entire floor and afterwards the floor is rinsed with water which is then extracted with the soil using a wet-vacuum.

I then repeated this same procedure with the second pad, which is a Medium 800 grit pad used to remove dirt from minor scratches and holes in the stone. After rinsing again, I went onto the third burnishing pad in the sequence which is a Fine 1500 grit pad that starts to rebuild the polish on the Travertine. I gave the floor another rinse and used the wet vacuum again to extract the water and soil from the floor. The last 3,000 grit super fine pad was then applied with a small amount of water sprayed onto the floor, this last pad really builds a nice shine on the stone.

Sealing a Travertine Tiled Floor

Once the burnishing process was completed the floor was left to dry off fully overnight and I came back the next day to continue with the work. I took a few moisture readings to confirm the floor was dry and then applied a single coat of Tile Doctor Colour Grow to seal the tiles. Colour Grow is a colour enhancing sealer that impregnates into the pores of the stone protecting it from within and improving the natural colours of the stone in the process. I particularly like to use it on Travertine as it really does bring out the brown shades in the stone.

Filling Holes in a Travertine Tiled Floor

Once the first coat of sealant had dried I started the work to fill the holes throughout the installation using appropriate colours of stone filler resin. I purposely delayed doing this until the first coat of sealer was in place in order to prevent excess resin from being absorbed into the tile and causing unwanted staining. There were quite a few holes to fill so it took a while to complete, the filler also needs several hours to dry and harden even when assisted with a fan. Excess filler is then polished off using a 17” rotary scrubbing machine fitted with a white polishing pad and any dust is carefully vacuumed up before applying a second coat of sealer. The floor was then allowed to dry before a final polish with a new 3000 grit pad to achieve a high sine finish.

Once the cleaning process was complete and the first coat of sealant had dried I then commenced the repair work by filling all holes throughout using appropriate colours of stone filler resin, the first coat of sealant is to stop the excess resin from being absorbed into the tile and causing staining, the filler is allowed to dry and harden for several hours assisted with a fan on site. Excess filler is then polished off using a 17” rotary scrubbing machine and a white buffing pad. Any dust is carefully vacuumed up before applying a second coat of sealant. This is then allowed to dry before a final polish with a new 3000 grit burnishing pad to achieve a deep sine finish.

Pitted Travertine After Filled Polished Rushden
I’m not sure the photographs really show off the transformation that I had managed to achieve, however my customer was certainly happy and left me the following glowing review via the Tile Doctor feedback system.

My hall and kitchen floor has been down for 12 years and has been a high traffic area. The Tile Doctor has literally made it look like new again. Holes filled, smooth, shiny and new again! My fully tiled bathroom has also been rejuvenated, wall tiles, shower tiles and floor tiles. The water now beads on the tiles like a freshly waxed car, and the walk-in shower has been perfectly resealed. Money very well spent.
Thank you so much! Mr.J. White, Rushden

Pitted Travertine After Filled Polished Rushden
It’s always nice to get feedback like that, it really does make your efforts feel appreciated.

Professional Travertine Tiled Floor Restoration in Northamptonshire

Pitted Travertine Floor Tiles Filled and Polished in Rushden Read More »

Victorian Tiled Floor Before and After Cleaning West Haddon

Victorian Tiled Hallway Floor Deep Cleaned and Sealed in West Haddon

The pictures below were taken of a Victorian tiled hallway floor in a large property in the old village of West Haddon. The tiles were in good physical condition for its age but required attention as it was looking very dull and dirty due to not being sealed for many years allowing a build-up of soil to embed in the surface of the tiles making cleaning very difficult.

Victorian Tiled Floor Before Cleaning West Haddon Victorian Tiled Floor Before Cleaning West Haddon

Deep Cleaning a Victorian tiled hallway floor

My first course of action was to vacuum the floor to remove light dust and debris, this was followed by applying Tile Doctor Pro-Clean diluted with warm water spraying several metres at a time. The solution was allowed to soak in for a short while before being agitated with a rotary machine fitted to a rotary machine and a stiff grout brush which was run along the grout lines. The section of floor was then rinsed with water and then this was extracted with a wet pick up machine. This process was then repeated through the entire area.

I then switched to a new cleaning process for Victorian tiles that was taught on a recent Tile Doctor training course. Basically it involves using a special diamond impregnated burnishing pad fitted to a rotary machine to resurface the tiles using just water. Again I worked in small sections until I had covered the entire area.

A common issue with these old Victorian floors is they were usually laid without a damp proof course; as a result it’s not uncommon for white salt deposits (efflorescence) to appear a few days after cleaning. To counteract this I gave the floor an acid wash using Tile Doctor Acid Gel, leaving it to dwell before rinsing. This helps neutralise the tile and will combat any salts rising up through the floor later.

Sealing a Victorian tiled hallway floor

I returned the following day to carry out repairs and to re set a couple of loose tiles which is not unusual for a floor of this age. The floor was then left to dry for a further day with a dehumidifier on site before returning to seal the floor with a breathable sealer for which we used two coats of Tile Doctor Colour Grow.

Colour Grow does a really good job protecting tiles as it soaks into the pores of the tile enhancing its colours whilst protecting from within however it leaves a matt finish and the customer wanted a sheen finish. This would not be a problem to achieve however it would require the application of another product and I was still concerned about potential efflorescence issues which would be more difficult to resolve with the application of a further sealer so I agreed to return several weeks later to finish the job.

As agreed I returned a few weeks later which allowed the floor to dry and guard against any damp issues and on my return I was happy to confirm the floor had fully dried using my damp meter and further there were no signs of efflorescence. I then applied 5 coats of Tile Doctor Seal & Go to give the customer the required finish she was after.

Victorian Tiled Floor After Cleaning West Haddon
I also left the client a free sample of our cleaning solution Tile Doctor Neutral Clean together with written maintenance instructions to help keep the floor looking its best for years to come.

Victorian Tiled Floor After Cleaning West Haddon
 

Maintaining a Victorian Tiled Hallway Floor in Northamptonshire

Victorian Tiled Hallway Floor Deep Cleaned and Sealed in West Haddon Read More »

Victorian Tiled Hallway Floor Northampton Before and After Repair and Cleaning

Restoring a Victorian Tiled Hallway in Northampton

The photographs below are from a Victorian tiled hallway floor at a house in Northampton where I was called in by the owner to inspect the floor for restoration, deep cleaning and re-setting of all loose tiles covering around 3sq metres.

Victorian Tiled Hallway Floor Northampton Before Repair and Cleaning Victorian Tiled Hallway Floor Northampton Before Showing Loose Tiles

Cleaning Victorian Tiles

The initial process was to vacuum and remove any loose debris before applying Tile Doctor Oxy-Gel to the entire area. Oxy-Gel is a strong alkaline based gel cleaner/stripper which is safe to use on tile and grout and being gel based it’s very easy to control. The gel was left to get to work on the dirt for ten minutes before being scrubbed into the tile with a black stripping pad fixed to a rotary floor machine. The resultant slurry and dirt was then rinsed with water and removed using a wet vacuum. The floor now free of dirt and old sealers was now prepared ready for repairs and re-grouting.

Grouting Victorian Tiles

The next step was to remove small sections of loose tiles and then re-fixing and re-grouting as required. We took care to replace tiles into their original position to ensure they sat together correctly. Once the section was replaced I removed the tiles in the next section and repeated this process until the 3sq metres of loose tiles were all reinstalled.

Victorian Tiled Hallway Floor Northampton During Repair Victorian Tiled Hallway Floor Northampton During Repair

I allowed the grout to dry for a few hours before polishing off excess grout with a cloth and removing difficult grout smears with a weak solution of Tile Doctor Grout Clean-Up. The floor was then rinsed again using water to remove any trace of products and then dried using the wet vacuum.

Victorian Tiled Hallway Floor Northampton After Repair Closeup Victorian Tiled Hallway Floor Northampton After Repair Closeup

Sealing Victorian Tiles

I returned a few days later to ensure the floor was completely dry as dampness can be issue with this type of tile, I then vacuumed the floor and gave it a light clean with Tile Doctor Neutral Cleaner to make sure it was spotless before sealing.

Once the floor had dried I took damp readings and when satisfied the floor was dry again I applied three coats of Tile Doctor Colour Grow Sealant for a light sheen finish and to enhance the natural colour of the floor. Colour grow is a penetrating sealer that protects from within by soaking into the pores of the tile stopping dirt from becoming ingrained there, it also enhances colour.

Victorian Tiled Hallway Floor Northampton After Repair and Cleaning Victorian Tiled Hallway Floor Northampton After Repair and Cleaning


Victorian Tiled Floor Restoration in Northamptonshire

Restoring a Victorian Tiled Hallway in Northampton Read More »

Renovating Victorian Hallway Tiles in Finedon

Century-old Victorian Tiled Floor Rejuvenated in Finedon

Finedon is a small civil parish in Northamptonshire with a big history. At the time the Domesday Book was complete in the late 11th century, the town was, in fact, a large royal manor held by the wife of Edward the Confessor.

In subsequent centuries the town has experienced a rich history and many of the current houses were built during the Victorian period (1837-1901). It came as little surprise to me, then, to get a call from a customer in the town who had recently found an original Victorian tiled floor underneath the carpet in her house.

Victorian Tiled Floor Before Cleaning in Finedon
The tiles were well over a century old. They had been covered by carpet for several years at least, and once unearthed they are clearly covered in paint and other debris from renovation work that had been carried out. Naturally, the customer was keen to restore the appearance of the tiles and so she called me, the local Tile Doctor, to get the job done.

Cleaning an Original Victorian Tiled Floor

You can see from the photos above that the floor was in quite a state – it took a whole day to clean. The floor area was only around eight metres squared, but it took two litres of Tile Doctor Remove and Go and three litres of Tile Doctor Pro-Clean to get it clean. Remove and Go is a very strong stripper that will just about shift any type of dirt or stain, while Tile Doctor Pro-Clean is a reliable high alkaline cleaner both products are designed for use on natural stone.

Once all the dirt, stains and paint splashes were removed, I washed down the floor with fresh water to neutralise the chemicals. I then installed some equipment to assist the drying process overnight, allowing the tiles to be sealed the next day.

There were also some cracks and missing grout that I replaced, along with some several loose tiles that I refitted.

Victorian Tiled Floor During Cleaning in Finedon

Sealing an Original Victorian Tiled Floor

I returned to the property the next day to seal the floor. To do this I used two coats of Tile Doctor Colour Grow, which provides robust protection and the quality matte finish the customer had requested.

As the name suggests, it also enhances the natural colours in the tiles, restoring character to this original feature. For a more traditional look, one litre of sealer was sufficient.

Victorian Tiled Floor After Cleaning in Finedon
Looking at the photos, you can see the huge improvement made over two days of work. One hundred years of wear and tear alleviated in 48 hours! The customer was thrilled.

100 Year Old Original Victorian Tiled Hallway Restored in Northamptonshire

Century-old Victorian Tiled Floor Rejuvenated in Finedon Read More »

Terrazzo Hallway Northampton After Cleaning

Heavily Soiled Terrazzo Hallway Restored in Northampton

This Terrazzo tiled hallway at a property in Northampton was in a really bad state. It was heavily soiled and suffered from glue marks where the original carpet covering it had been removed. Additionally, there was some damage to the edges of the doorway, and a large crack in the floor running across the width of the hallway.

Terrazzo Hallway Northampton Before Cleaning
Terrazzo is an interesting material, originally produced in Italy, that consists mainly of concrete with segments of marble and other stone interspersed and held together with a resin. Since Terrazzo is formed in this way, I explained to the customer that I would fill the crack along the floor and the small holes around the edges with concrete, before then using tile paint to match in the colours as best as possible. This would be the most cost-effective solution, which was ideal since the customer had a limited budget for the repairs.

Terrazzo Hallway Northampton Before Cleaning
Before beginning the restoration, I tested a small area using a diamond encrusted burnishing pad, thereby giving the customer an indication of the type of results that could be achieved. With the customer pleased by the results, the job was booked in for the following week.

Terrazzo Hallway Northampton Before Cleaning

Cleaning and Burnishing a Soiled Terrazzo Tiled Hallway

To begin, Tile Doctor Remove & Go was applied to the floor and was left to dwell for ten minutes to soften the carpet glue and break down any old sealer. This was then scrubbed in to the tiles with a pad fitted to a rotary machine. To remove the remaining residue and marks in the particularly stubborn areas, I used a manual hand scraper. The entire floor was then wet vaxed to soak up the soiled cleaner and leave the area clean for burnishing.

This was followed by the use of Tile Doctor diamond encrusted burnishing pads to polish the tiles, starting with a coarse grit pad, followed by wet vaxing and repeating the process with a medium grit pad and finally the fine grit pad to achieve the desired effect. I then installed a turbo dryer to dry the floor.

I returned to the property once the floor was dry and carried out the repairs which had been discussed earlier with the customer (filling the holes and cracks in the floor with concrete), cleaning off any concrete residue before I finished for the day.

Sealing a Terrazzo Tiled Hallway

Upon my return to the property the next day, I refined the polish on the floor even further by applying the extra fine grit burnishing pad.

Terrazzo Hallway Northampton After Cleaning
To finish off the three day restoration, I sealed the Terrazzo tiles using two coats of Tile Doctor Colour Grow sealer. As an impregnating sealer, Colour Grow soaks into the pores of the stone, protecting it from ingrained dirt. Colour Grow also contains colour intensifying properties, allowing it to enhance the naturally occurring shades in the stone, and therefore stopping it from appearing dull.

Terrazzo Hallway Northampton After Cleaning
This floor certainly was in a bad state, with damage as well as dirt to deal with, but I’m pleased to say that the work went a long way in transforming its appearance, leaving a very happy customer.

Terrazzo Hallway Northampton After Cleaning
 

Professional Terrazzo Tiled Floor Restoration in Northamptonshire

Heavily Soiled Terrazzo Hallway Restored in Northampton Read More »

Victorian Tiles–Stamford after sealing

Cleaning and Sealing a Victorian Quarry Tiled Hallway Floor in Stamford

This hallway floor was actually at a house in the town of Stamford which is just over the northern border of Northamptonshire and slightly out of my area; however I was recommended to the owner by another client which is always welcome and a testimonial in itself. I work right across the county so it wasn’t long before I was in the general area and arranged a visit to carry out an inspection of the Victorian Quarry tiled floor and provide a quote for a full restoration.

The owner of the house had just moved in recently and although the floor was in good overall physical, it was in need of a thorough clean and new seal to bring back some life to the tiles. Additionally she was having lots of other building work done to the house and she wanted to retain this as an original feature of the property. My quote was accepted and I was able to book the work in for the following week.

These first photos show how dull the floor looked due to a build-up of builder’s dust and general wear and tear. They also show some of the equipment needed to undertake the following cleaning process.

Victorian Tiles Stamford Before Cleaning Victorian Tiles Stamford Before Cleaning

Cleaning a Victorian Tiled Hallway Floor

I used a brush and vacuum to remove as much loose debris and dust from the surface of the floor as possible. I then applied a strong dilution of Tile Doctor Pro Clean to the floor which is a strong alkaline cleaner which can also be used to remove sealers; the solution was left it to dwell for roughly ten minutes before agitating it with scrubbing pads and brushes to remove the muck that was lifted to the surface. This was then wet-vacuumed twice to remove all the slurry and neutralise any chemicals.

Victorian Tiles Stamford Before Cleaning
As it was such an old property I then used a steamer to heat up the tiles and draw up any contaminants and assist with the drying process. I also chose to install two fans and a dehumidifier to dry the floor even further.

Victorian Tiles Stamford After Stripping and cleaning
With the cleaning process complete – and achieving a marked difference to the appearance of the floor – I left the tiles to finish drying for 24 hours.

Sealing a Victorian Tiled Hallway Floor

Upon my return to the house, I checked for any excess moisture by running damp tests as this has the potential to affect the performance of the sealer. Once satisfied with the results, I sealed the floor with two coats of Tile Doctor Colour Grow, a colour enhancing sealant which offers both a robust surface seal and an aesthetically pleasing finish.

I also carried out water repellency tests to ensure the sealer was working as expected and the floor had sufficient protection and will be hard-wearing for a hallway which is a high traffic area.

Victorian Tiles Stamford After Cleaning Victorian Tiles Stamford After Cleaning

On my client’s return to the house she was very happy with the final results – in fact, she was also in contact about some further work in the New Year!

Professional Victorian Quarry Tile Floor Stripping, Cleaning and Sealing

Cleaning and Sealing a Victorian Quarry Tiled Hallway Floor in Stamford Read More »

Victorian Tiles After Restoration Northampton

Restoring a Victorian Quarry Tiled Hallway in Northampton

Here’s a job I completed just before Christmas last year, at a house in Northampton which has a rich history and mix of architectural styles. The run up to Christmas is always popular as people try to get their household projects finished off in time for celebrating the festive season with family so this is always a busy time for Tile Doctor.

The photos below show a neglected Victorian Quarry tiled floor in need of repair, with cracked tiles along the edges. These were caused by somebody in the past using brute force to remove carpet gripper rods which had been glued to the tiles. These cracks were present around the edges of the entire hallway, however; this particular type of tile is very hard to get hold of. Furthermore, it is a costly process to replace the tiles as the skirting boards would have had to have been removed.

Victorian Tiles Before Cleaning Northampton
As well as the physical issues the floor had a dull appearance due to the build-up of builder’s dust and the general wearing down of the paintwork over time. I agreed with the client that the best course of action would be to fill the tiles, and paint the damaged tiles using a colour that matched as close as possible. Many of my Tile Doctor colleagues would disagree with this approach opting to source the correct tile and rebuild the damaged section however unfortunately in this case we didn’t have the time or the budget.

Victorian Tiles Before Cleaning Northampton

Cleaning and Repairing a Victorian Quarry tiled floor

My first action was to use a brush and vacuum to remove as much loose debris and dust as possible. I followed this by agitating the tiles with a dilution of Tile Doctor Pro Clean which is a strong alkaline product and safe to use on tile and stone. I use a combination of a coarse burnishing pad fitted to a rotary machine and hand held brushes, in order to get the floor clean. The resulting slurry was then rinsed and removed using a wet vacuum. This process was repeated twice followed by a thorough rinse to ensure any trace of cleaning agent had been removed and the floor neutralised.

Victorian Tiles During Cleaning Northampton
As this was such an old property, I then used a steamer to heat up the tiles in order to draw out any contaminants and assist with the drying process. I installed a fan to dry the floor before starting repairs, mixing up some coloured grout and filling all holes and cracks along the edges, including the doormat area.

Victorian Tiles During Repair Northampton Victorian Tiles During Repair Northampton

I allowed the coloured grout to dry overnight, before hand painting the black and Terracotta tiles. These were then given time to dry (about a couple of hours). Following this, I carefully painted in the other colours: brown and cream. The overall effect was quite convincing and you had to look very closely to notice.

Victorian Tiles Before Painting Northampton Victorian Tiles After Painting Northampton

Sealing a Victorian Quarry tiled floor

Due to the fact that there were other tradesmen working in the house at the time, the floors were sheeted up to protect from additional dust and muck. I then left the house for a week, allowing the floor ample time to dry completely in preparation for sealing.

Upon my return, I took damp meter readings, and once satisfied with the dryness of the tiles, I began the sealing process with the impregnating, colour-enhancing sealer Tile Doctor Colour Grow. The sealer provides both durable surface protection and an aesthetically pleasing matte finish.

The below photos show how the product has enriched the colours with the two coats applied.

Victorian Tiles After Restoration Northampton Victorian Tiles After Restoration Northampton

The process of restoring this wonderful Victorian Quarry tiled floor was certainly time consuming, but very rewarding. I am exceptionally pleased with the results myself, and my client couldn’t have been happier and I’m sure the newly revitalised hallway will have been a talking point for all their visitors during the Christmas break.

Victorian Tile Repairing, Cleaning and Sealing in Northamptonshire

Restoring a Victorian Quarry Tiled Hallway in Northampton Read More »

Stained Travertine Hallway Oundle After Cleaning

Renovating A Badly Stained And Hole-Marked Travertine Tiled Floor In Oundle

I recently completed quite a substantial cleaning job at a house in the small, historic market town of Oundle, Northamptonshire. My client had a badly stained Travertine tiled floor that ran throughout her hallway, kitchen, utility area, and toilet.

Travertine is a fantastic choice for tiled floors because it has distinct features which no other stone can offer. It’s not surprising, then, that is popularly used for both residential and commercial flooring. In this case however the appearance of the tiles had been further spoiled by dozens of holes, and my client had attempted to remedy this problem by filling some of the holes with concrete. This had left the floor looking inconsistent and certainly worse for wear.

Stained Travertine Kitchen Oundle Before Cleaning Stained Travertine Hallway Oundle Before Cleaning

Cleaning a stained Travertine tiled floor

On day one, my first job was to address the holes marked the tiled surface. I filled the unsealed holes with matching filler, before re-colouring the concrete that had been previously used as a makeshift sealer, thus creating greater consistency in the appearance of the floor.

Following this, I made a strong dilution of Tile Doctor Pro-Clean, which is a high alkaline cleaner which is safe to use on stone, in order to tackle the bad staining on the tiles and grout lines. Once applied to the floor, the solution was left to dwell for a short period of time. By allowing the solution to sit like this, the cleaner is able to seep into the stone, get underneath the dirt and stains, and lift them to the surface. Pro-Clean is highly effective at treating stained tiles, while common acid-based, household cleaning products can cause further damage over time.

To remove the resulting muck from the surface I used a set of Tile Doctor Burnishing pads applying them individually to each tile in sequence from Coarse to Fine, rinsing the floor in-between each pad and removing the resulting residue using a wet-vac machine. The pads are encrusted with diamonds and are ideal for bringing back the finish of Travertine and did a great job of making the filled holes look part of the original floor.

Stained Travertine Kitchen Oundle After Cleaning

Sealing a Travertine tiled floor

After leaving the floor to dry overnight, I returned to the house to seal the newly cleaned tiles. I did this using Tile Doctor Colour Grow, a colour intensifying sealer that also provides a durable surface seal and pleasing finish (as you can see from the photographs).

Overall the job took roughly two days of work to complete and my client was extremely pleased with the results and even left the following comment on the Tile Doctor feedback system:

“Phil was reliable and very professional. Written quote provided detailing in exact detail the work to be done and the products to be used. It was a large area that needed to be treated. Arrived on time and got the job done in good time. Certainly recommend Phil”.

Stained Travertine Hallway Oundle After Cleaning
 

Stained Travertine tiled floor restoration in Northamptonshire

Renovating A Badly Stained And Hole-Marked Travertine Tiled Floor In Oundle Read More »

Old Quarry tiled floor after restoration Hackleton

Quarry Tiled Hallway Cleaned and Restored in Hackleton

This was a restoration I did for a couple living in Hackleton, Northampton, who had just moved into their new home and wanted their recently discovered Quarry tiled hallway fully restored before their housewarming party.

Old Quarry tiled floor before restoration Hackleton
The couple had lifted up the carpet upon moving into the house to find a dirty and damaged floor beneath. It had been marked with glue around the edges where the carpet gripper rods had been stuck down upon installation. My clients had attempted to remove the unsightly glue marks themselves using a chisel and hammer. Unfortunately, the DIY job actually caused further damage to one tile, leading to the couple seeking the services of a professional to complete the job properly. It was especially important to have the floor ready quickly, as there was only ten days to go before the housewarming party.

Old Quarry tiled floor before restoration Hackleton

Stripping and cleaning a Quarry tiled hallway

After providing the couple with a quote, I began working on the hallway. My first task was strip the Quarry tiles of the old sealer using a combination of black stripping pads and Tile Doctor Remove & Go, a multi-purpose product which contains both strpping and cleaning properties. Remove & Go was left to soak into the tiles before being scrubbed into the floor using a rotary scrubbing machine. After successfully breaking down the layers of old sealer, I rinsed the floor using clean water and soaked up the residue with a wet-vac machine.

Old Quarry tiled floor before restoration Hackleton
The next stage of the job involved removing the old glue marks by hand from around the edges of the hallway. This was painstaking work in which I utilised both a scraper and a hand brush to carefully rid the tiles of these blemishes. Working in small, two metre sections of the floor, I then applied a second coat of Remove & Go, allowed it to soak into the area for a further ten minutes, and then rinsed it with clean water. During my inspection of the floor I also noticed a few splashes of paint, which I duly removed by hand.

Sealing a Quarry tiled hallway

Due to the pressure on time leading up to the housewarming party, I needed to speed up the drying process. I did this by installing a dehumidifier and a turbo fan. The floor was then left to dry for more than 24 hours before I returned to complete the sealing.

Upon my return I took damp meter readings in order to determine which sealer would be the best to use. I resolved to use Tile Doctor Colour Grow, an impregnating sealer which is fully breathable, allowing dampness to escape from this type of tile. This is important, as the tiles had been first installed many years ago with no damp proof membrane. As the sealer dried it provided the floor with a nice, light sheen. Since Colour Grow is also specially designed for colour intensification, the fantastic natural shades and colours in the Quarry were really brought to life again.

Old Quarry tiled floor after restoration Hackleton Old Quarry tiled floor after restoration Hackleton

My clients were extremely pleased with the results, with the prompt and efficient service ensuring that the job was completed in good time for their housewarming party.

Old Quarry tiled floor after restoration Hackleton
 

Restoring a Quarry Tiled Hallway in time for a Party in Northamptonshire

Quarry Tiled Hallway Cleaned and Restored in Hackleton Read More »

Victorian Hallway Tiles Builder Cleaning after in Northampton

Refurbishing a Victorian Tiled Hallway in Northampton After Building

This customer asked me to pay a visit following work to refurbish the house and wanted to restore as many original features as possible; work had been going on to restore coving, picture rails, ceiling roses and fireplaces but unfortunately nobody had thought to cover up the beautiful Victorian floor. When I arrived there was plaster dust and splashes of paint all over the floor that needed attention. A quote was given which was accepted and the work was booked in for the following week.

Victorian Hallway Tiles Builder Cleaning before in Northampton Victorian Hallway Tiles Builder Cleaning before in Northampton

Cleaning Victorian Quarry Tiles

My first course of action was to vacuum the floor to remove any loose debris so I could assess how to proceed. I then applied diluted Tile Doctor Pro Clean with a pump up sprayer and left it to dwell on the tiles for fifteen minutes before working it in with a black scrubbing pad and hand brushes. The now soiled cleaning solution was then rinsed off together with most of the plaster and surface dirt which had come away in the process. I was then left with a few paint splatters which I removed by spot treating by hand with Tile Doctor Remove and Go; it became clear at this stage that the Pro-Clean had not removed all the old sealer and so I decided to spray the whole floor with a dilution of Remove and Go and work it in with brushes, the solution was left for a further ten minutes and then rinsed away with an extraction machine.

Sealing Victorian Quarry Tiles

The floor was left alone to dry for several days with a fan on site to assist the process. The customer wanted the floor to look traditional and requested a matt finish so when I returned to site two coats of Tile Doctor Matt Colour Grow Sealer was applied. Colour Grow is breathable and will allow any damp to evaporate without disrupting the finish, this is important as floors of this age were laid without any damp proof course or membrane which can sometimes result in damp issues.

Victorian Hallway Tiles Builder Cleaning after in Northampton Victorian Hallway Tiles Builder Cleaning after in Northampton


Victorian Tiled floor Restored after Building works in Northamptonshire

Refurbishing a Victorian Tiled Hallway in Northampton After Building Read More »

Ceramic Tiled Hallway After

Travertine Kitchen floor Cleaned and Sealed in Brixworth

This house in Brixworth near Northampton had Travertine tiles fitted in the kitchen and Ceramic tiles in the hallway, both of which were in need of a deep clean. It was clear that the sealer on the Travertine tiles had stopped working allowing dirt to become ingrained in the surface causing it to become very difficult to clean, you can see this quite clearly in the photographs below, the grout had also become darker.

Travertine Kitchen Tiles Before Travertine Kitchen Tiles Before

Cleaning Travertine Tile

Travertine is a very hard surface so normally it’s necessary to use diamond encrusted burnishing pad system to clean, strip and polish the floor, in this case however I decided to try a combination of stripping and high pressure clean instead. I started by applying a dilution of Tile Doctor Pro-Clean which is a multi-purpose tile cleaner safe to use on natural stone. This was left to dwell on the floor so it could get to work on the dirt before being worked in to the stone using a black stripping pad fitted to a rotary machine. This was then rinsed off with high pressure spinning tool operating at 1200 PSI to blast out the dirt from the pitted tiles and badly soiled grout lines.

Sealing Travertine Tile

The tiles were left to dry overnight and we came back the next day to seal the Travertine tile with two coats of Tile Doctor Seal and Go which will provide on-going stain protection as well as giving the tiles the glossy finish the customer had requested.

Travertine Kitchen Tiles After Travertine Kitchen Tiles After

Cleaning Ceramic Tile

To tackle the Ceramic tiles in the hallway we used a similar system involving the use of Tile Doctor Pro-Clean and a scrubbing pad to get the tiles clean; Ceramic tiles however are usually glazed and won’t take a sealer the top layer of Grout however is porous and to protect that we applied Tile Doctor Seal and Go along the grout lines.

Ceramic Tiled Hallway Before Ceramic Tiled Hallway After


Travertine and Cermaic Tiles maintenance in Northampton

Travertine Kitchen floor Cleaned and Sealed in Brixworth Read More »

Scroll to Top