Marble Tile Cleaning

Welcome to my Work History archive where you will find detailed examples of the cleaning and renovation of Marble tiles carried out in Northamptonshire

Cleaning and Polishing Marble tiles

Marble is reputed in the international market for its premium quality, toughness and durability. It is often the preferred choice for interior and exterior in both commercial and domestic situations for flooring, wall cladding, paving, facades of buildings, pavements and landscaping.

One of the main issues with polished Marble is the polish starts to wear down with use and eventually becomes dull. Another issue we see is acid etching where strong unsuitable cleaning products used on the stone etch the surface and ruin its appearance. To resolve both these problems the stone needs to be re-polished with diamond encrusted burnishing pads of different grits to hone the stone and bring back that deep shine. If this sounds familiar you should talk to us about our annual maintenance program where we visit you once a year to clean, polish and seal your floor thus keeping it in top condition.

Below you will find detailed examples of work we have carried out in the past, it should give you some idea of what’s involved and what can be achieved with the right techniques and products.


Pale Marble Floor Clean Seal Old Village

Grout Cleaning and Polishing a Marble Tiled Floor in Old Village

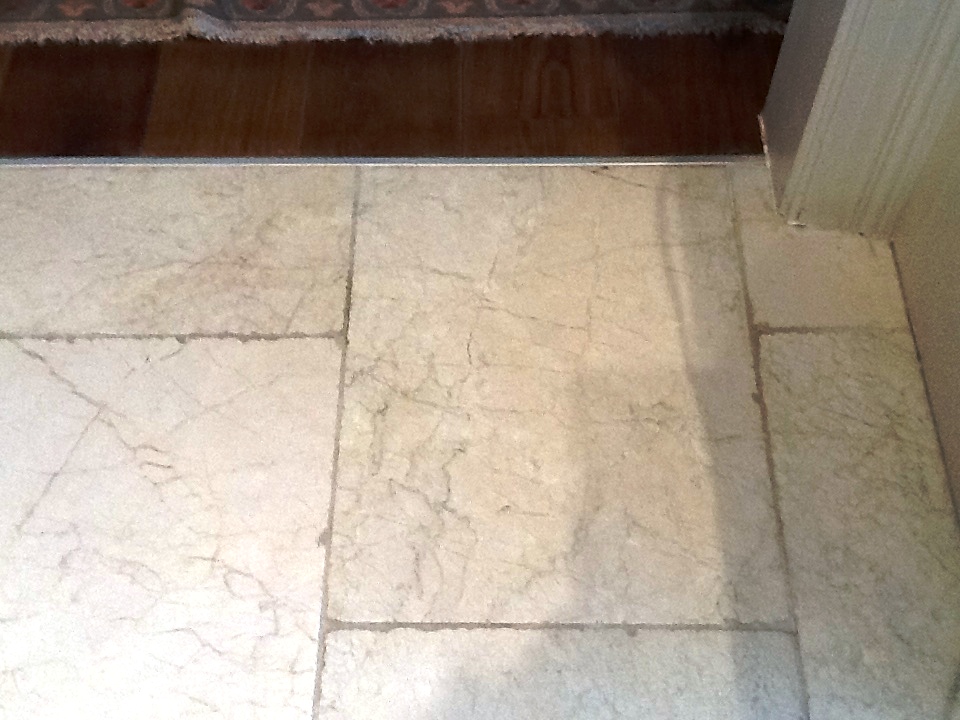
Last year I was called to look at Polished Marble floor at a house in the small village of Old in Northamptonshire which is situated between Kettering and Northampton. The Marble floor was reasonably large at 25m2, and the main problem was the Marble had lost most of its shine, becoming dull and lifeless over time, additionally the grout which was once white had darkened with ground in dirt,

Marble Tiled Floor Before Grout Cleaning and Polishing

If you want the look of a highly polished floor then it will need regular polishing to keep its appearance, in fact Tile Doctor provide a “Maintenance Plan” service for this purpose. How often you need a repolish really depends on how much the floor is used and for a busy high traffic area such as this kitchen diner it may be necessary to have two visits a year.

In this case the Marble needed a lot more than a repolish, my client was unhappy with the stained grout lines and the tiles really needed stripping and resealing to bring the colour back to somewhere near its original. After surveying the floor, I was able to confirm what needed to be done and gave them a price for the work which they were happy to accept.

Cleaning and Polishing a Marble Tiled Kitchen Diner Floor

To get the grout clean and give remove grit etc from the floor before polishing I gave it an initial clean using a medium dilution of Tile Doctor Pro-Clean. This is a professional Tile and Grout cleaning product which is applied to the grout, left to soak in for ten minutes and then scrubbed into the grout line by hand. The soil is then rinsed off with water and then extracted with a wet vacuum.

To bring up the polished appearance of the Marble tiles I used a set of four 17” diamond encrusted burnishing pads which have different levels of grit. The pads are applied to the Marble tiles in sequence using a floor buffer and a small amount of water for lubrication. I started with a coarse pad, before moving on to a medium pad, then a fine pad on the first day, working in small sections of around 4 – 5sqm. The floor is given a thorough rinse between each pad to remove any excess residue generated from the burnishing process. The soil was then extracted using a wet vacuum to keep the mess to a minimum.

Sealing a Marble Tiled Kitchen Diner Floor

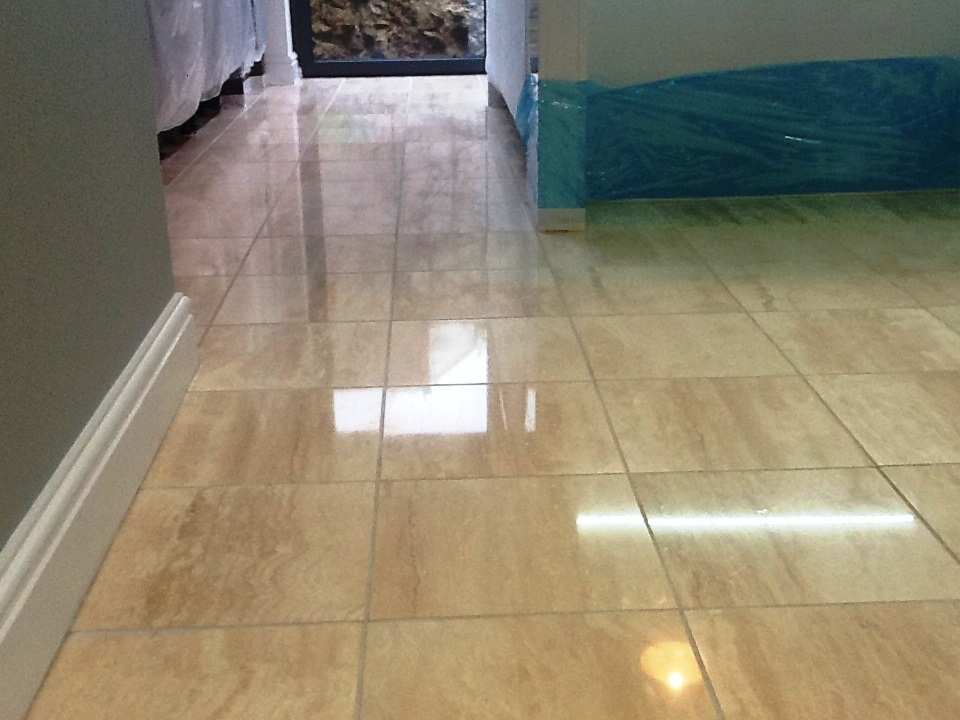
The floor was left to dry overnight, and I returned the next day. I carried on the process using the very fine burnishing pad to achieve a high shine finish. This pad is applied dry to the floor using only a little water sprayed onto the tile. It brings up the final polish on the tiles and leaves the floor dry so it can be sealed afterwards.

To seal I applied a single coat of Tile Doctor Ultra-Seal which is a premium impregnating sealer that soaks into the pores of the stone protecting it from within. It’s a natural look sealer and by this, I mean it doesn’t alter the natural look of the stone and is almost invisible. The area was dried with a fan for one hour and then I checked the performance of the sealer by carrying out a water repellence test. The result of this test will let me know if a second coat of sealer may be needed.

Marble Tiled Floor After Grout Cleaning and Polishing

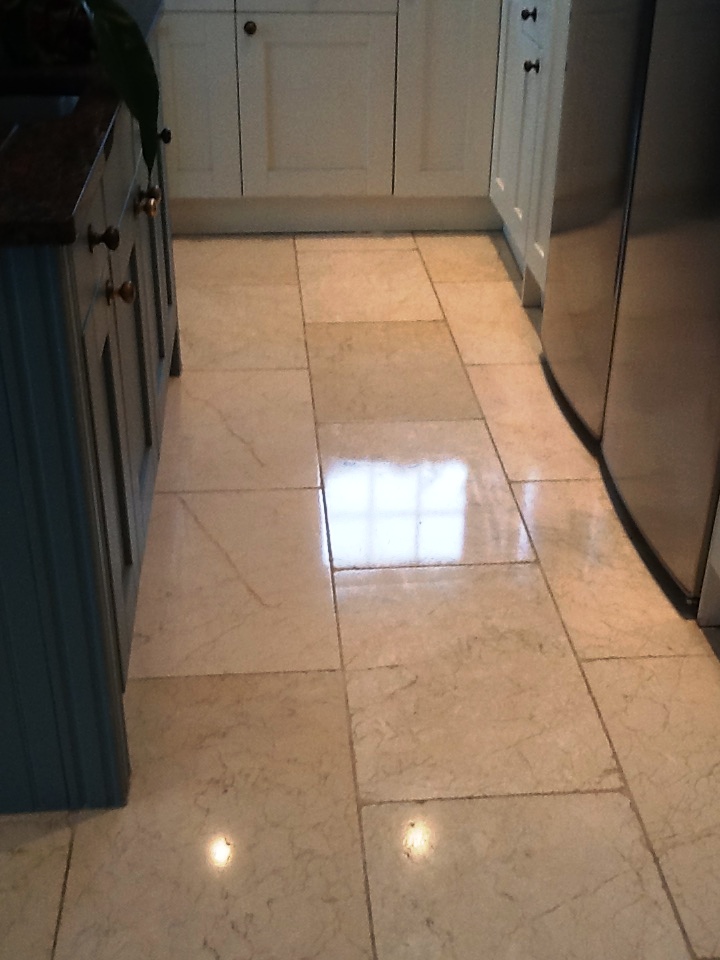
Once complete the grout was white again and the Marble tiles had a deep shine to them. My client was very happy with the results of my work and took the time to leave the following comment on the Tile Doctor feedback system.

Marble Polishing and Grout Cleaning Testimonial Old Village

For aftercare cleaning I recommended Tile Doctor Stone Soap which will keep the floor clean and help maintain the lustre. I also I let them know about our maintenance program which involves popping back for a couple of hours once a year to give the floor a polish with a very fine 3000-grit burnishing pad and top up the sealer.

Marble Tiled Floor After Grout Cleaning and Polishing


Professional Restoration of a Marble Tiled Floor in Northampton

Grout Cleaning and Polishing a Marble Tiled Floor in Old Village Read More »

Marble Hallway Floor Before After Renovation Earls Barton

Polishing Water Stained Marble Flooring in Earls Barton

I was asked to look at a Polished Marble floor that had been installed in the hallway of an executive property in the Northamptonshire village of Earls Barton and had suffered severe water damage from a burst pipe. Water had penetrated through the ceiling and as the occupants were away at the time two inches of water had flooded the ground floor where it sat for several weeks causing extensive damage and efflorescence to appear in patches all over the floor. The homeowner was extremely worried as this was a very expensive and large Marble floor which was a key feature of the property and didn’t want the disruption of having the tiles lifted and replaced.

As you can see from the pictures, there were white etching marks over the surface of the marble ruining the polished appearance and these could not be removed using normal domestic cleaning processes.

Water Stained Marble Floor Before Renovation Earls Barton Water Stained Marble Floor Before Renovation Earls Barton

I wasn’t surprised to find that the owners couldn’t restore the polished appearance of the Marble, as a hard stone like Marble needs to be burnished to build up a polish. I carried out a damp test and cleaned a test area using diamond encrusted burnishing pads, as the floors were still slightly damp I advised the customer to turn on the underfloor heating to assist in drying out the stone for a week, in that time a quote was issued and accepted and the work was booked in.

Restoring the Appearance of Water Damaged Marble Flooring

Before work commenced, I instructed the client to turn the underfloor heating off as it can affect the chemicals and cleaning process by drying the floor out too quickly.

To restore the polished appearance of the Marble I applied a set of five 17” diamond encrusted burnishing pads which come in 200, 400, 800, 1500 and 3000 grit and are applied to the stone with a heavy duty weighted rotary machine. I started with the very coarse 200-grit pad and worked up through the series of pads gradually building up the polish with increasingly finer grit pads. Water was used to lubricate the polishing process and I rinsed the tiles in between with more water to remove the soil generated using a wet vacuum to remove the resultant soil.

Water Stained Marble Floor During Renovation Earls Barton

I also used a set of 6” diamond encrusted burnishing pads with a handheld machine for getting close to the edges and around the pillars to ensure the floor was polished evenly throughout all areas.

Achieving a High Shine Polish on Marble Tiles

Once the stone had dried, I carried out the final polish to a very high shine as requested by the customer using the very fine 3,000-grit burnishing pad. Unlike the other pads this one is applied dry with only a little water sprayed onto the tile. To finish I applied a couple coats of Tile Doctor Colour Grow which is a colour intensifying impregnating sealer that will provide durable protection going forward making it very easy to clean.

Once complete the natural features of the Marble really stood out and the hallway looked stunning, certainly our client was greatly relieved and very pleased the floor had been restored to its former glory and was once again a beautiful feature when friends and family enter the property.

Water Stained Marble Floor After Renovation Earls Barton Water Stained Marble Floor After Renovation Earls Barton

To keep the Marble looking its best I recommended the client use Tile Doctor Stone Soap going forward and left a complimentary bottle and cleaning instructions. This product has been specially formulated for the regular cleaning of polished stone, it helps build patina and will keep it in excellent condition between professional maintenance cleans.


Restoring the Appearance of Polished Marble in Northamptonshire

Polishing Water Stained Marble Flooring in Earls Barton Read More »

Stained Marble Tiled Floor Before After Polishing Northampton Northamptonshire

Marble Floor Tile Polishing in New Duston, Northampton

The Marble floor tiles in the pictures below covered a large kitchen, family room and utility area at a property in New Duston near Northampton. The client who was a builder had been recommended our services by one of his own clients, so he contacted us for advice on how to renovate the Marble flooring.

Marble Floor Restoration New Duston Before Polishing

I went to the property to survey the floor and could see straight away that the tiles were dull, lifeless with some staining and hardly recognisable as Marble. I recommended the floor was honed through a polished process known as burnishing, followed by the application of a sealer to provide durable protection for the stone. I organised a quote which was accepted, and we arranged a date for the work to start.

Marble Floor Restoration New Duston Before Polishing

Apologies in advance for the quality of the photographs, it’s tricky this time of year when the light is failing to capture a good photo.

Restoring Polish to a Marble Tiled Floor

I began the burnishing process, which involves the application of a set of Tile Doctor diamond encrusted burnishing pads attached to a 17” rotary machine. At Tile Doctor we work with a four-pad system that allows us to gradually refine the polish on suitable stone floors which generally including Marble, Travertine and Limestone. I started the process by applying a 400-grit coarse burnishing pad lubricated with a little water, working in small sections. Following this, I worked my way through the burnishing system, repeating the process with 800-grit medium and 1500-grit fine grit burnishing pads. I also used some small hand-held burnishing blocks in the difficult to reach corners and edges. The floor is given a quick rinse using a wet pick up machine between pads in order to remove the resulting slurry before starting with the next pad.

Marble Floor Restoration New Duston During Polishing

I left the floor to dry off overnight to give the Marble tile and grout time to dry and returned the next day to finish the polishing and seal the floor.

Sealing a Marble Tiled Floor

The last 3000-grit pad builds up a high polish on the floor and is applied dry with only a little water squirted on the tiles in a process we call a Spray Burnish. One of the advantages of this method is it leaves the floor dry so is ready for sealing.

Now that I had achieved a good level of shine, I then proceeded to seal the floor to protect the stone against future dirt, stains and damage, which is more common in busy areas of a house like the kitchen. I applied two coats of Tile Doctor Ultra Seal allowing drying time between each coat. This is a no-sheen, natural-look, penetrating sealer which is formulated to provide maximum stain protection, especially in food areas such as the kitchen. Once the sealant had hardened, I ran over the floor with a white buffing pad to further enhance the look of the Marble floor.

Marble Floor Restoration New Duston After Polishing

The customers were extremely happy with the results and as with all customers I advised on the best maintenance for their floor and provided a complimentary bottle of Tile Doctor Stone Soap to help them maintain the beauty of their floor.


Professional Restoration of Polished Marble Tiled Floor in Northamptonshire

Marble Floor Tile Polishing in New Duston, Northampton Read More »

Black Marble Vanity Worktop Before and After Polishing in Northampton

Damaged Marble Bathroom Countertop Polished and Sealed in Northampton

Marble is known for its premium quality, toughness and aesthetic, making it a very popular choice for bathroom countertops, such as this one at a house in Northampton. However just because it’s tough doesn’t mean that Marble can be cleaned with the usual household cleaners. Like all natural stone, Marble is acid sensitive and unsuitable products can have a very damaging effect on its appearance.

In this situation, the property owner had used a limescale remover to remove some unsightly marks from the countertop. Unfortunately, the product was acid-based and instead of making an improvement it just made it worse and caused severe etching.

Black Marble Vanity Worktop Before Polishing in Northampton
The first photo above shows the limescale marks from where toiletries have been placed on the side whilst wet. Since Northampton is a hard water area, the limescale deposits over time caused these marks to appear.

Burnishing a Damaged Marble Bathroom Countertop

The only way to effectively remove the Limestone deposits – while at the same time rectifying the damaged caused by the botched cleaning attempt – was to use a system of hand-held diamond encrusted pads and hand help blocks of various grits to cut back the stone and re-polish it, a process we call burnishing.

Before officially beginning the burnishing process, I ran a few tests to determine the type of pad I would need to use to achieve the best results. I found that, in most areas, I would need to use the Tile Doctor 400 Grit (Coarse) pad to resurface the tile and remove the damaged layer of stone, but in some areas where the etching was worse, I would need to use the 200 Grit (Very Coarse) pad.

After burnishing the affected areas with the Coarse and Very Coarse grit pads, I started to incrementally polish the stone to achieve a high-quality shine, working my up through the Medium, Fine and Very grit pads.

Black Marble Vanity Worktop During Polishing in Northampton
No chemicals were used during this process – only water for lubrication, combined with the six-inch diamond encrusted burnishing pads fitted to a hand-held buffing machine.

Sealing a Marble Bathroom Countertop

The final part of the restoration was to seal the stone to maintain a long-lasting, deep polished appearance. To do this, I used Tile Doctor Shine Powder, which is a crystallising sealer in powder form. The powder is applied directly and combined with water, before being worked into the stone to seal it.

Black Marble Vanity Worktop After Polishing in Northampton
The customer was very happy with the results and the level of shine achieved. I gave the customer a complimentary bottle of Tile Doctor Stone Soap, which is our aftercare cleaner for polished natural stone, along with instructions on periodic maintenance to help maintain the finish we had achieved for as long as possible.

Removing Limescale Marks from a Polished Marble Countertop in Northamptonshire

Damaged Marble Bathroom Countertop Polished and Sealed in Northampton Read More »

Egyptian Marble Patio Path Bozeat Before and After Cleaning

Neglected Egyptian Marble Patio Transformed in Bozeat

Patios are particularly difficult to keep clean as they are continuously exposed to the elements fortunately Tile Doctor specialises in cleaning and restoring all different types of natural stone internal and external.

I was recently asked to restore a patio at a house in Bozeat, a village in Northamptonshire. The patio was consisted of both floor tiles and walls, and was made of a rather uncommon stone: Egyptian-style Marble.

Stained Patio Wall Before Cleaning
The customer had clearly taken pride in the presentation and aesthetic of his garden but, having a concentrated on other projects for the past couple of years, he had neglected to preserve the condition of patio. Making matters worse, the patio had never been sealed, and this had allowed dirt and moss to become ingrained in the stone. The customer was also concerned by a large rust mark left on the stone where old garden furniture had been sitting.

Egyptian Marble Patio Path Bozeat Before Cleaning Rust Stained Egyptian Marble Patio Bozeat Before Cleaning

Upon my first visit to the property, I carried out a test clean on a small patch of Marble using Tile Doctor Pro-Clean, which is a high-alkaline cleaner that we find particularly reliable to use on natural stone. The customer was very impressed by the sudden improvement in the condition of the test patch. I also tested a new product by the name of Tile Doctor Rust Away, which is a non-acidic rust remover. Amazingly, the product helped to reduce the rust stain by about 90%.

The full restoration was booked in to take place within a fortnight.

Cleaning an Egyptian Marble Patio

The first part of the restoration involved cleaning the entire patio with Pro Clean, although I worked one small section at a time. The product was worked into the stone using a black scrubbing pad fitted to a rotary machine. The resulting slurry was rinsed away using a Honda Petrol jet washer and a spinning tool, leaving the patio clear of most of the dirty, algae and moss.

Next, I treated the entire rust stain with Rust Away. The product was scrubbed in using a handheld brush and left to dwell for a few minutes, before I rinsed the area with the jet washer and spinning tool. The stone had a matte finish, but to remove the deeper staining, I needed to use a set of three diamond-encrusted burnishing pads, which we typically use for polishing stone and removing light scratches and marks.

Sealing an Egyptian Marble Patio

Luckily, the weather proved to be good, so I could return to the property the following day to seal the patio, including the walls, with Tile Doctor Ultra-Seal, which is an impregnating, natural-look sealer designed to ensure maximum stain protection.

Egyptian Marble Patio Bozeat After Cleaning Egyptian Marble Patio Bozeat After Cleaning

The photos really do speak for themselves, showing the amazing results and transformation of the garden. I left the happy customer with some maintenance instructions to keep the appearance of stone up as it is exposed to the elements.

Egyptian Marble Patio Path Bozeat After Cleaning
 

Professional Restoration of an Egyptian Marble Patio in Northamptonshire

Neglected Egyptian Marble Patio Transformed in Bozeat Read More »

Polished Marble Great Doddington after restoration

Marble Tiled Sun Room and Kitchen Transformed in Great Doddington

The following post shows the kind of results we can achieve for a Marble tiled floor which hadn’t been properly cleaned, polished or re-sealed for several years. This floor was also suffering from numerous cracks and other instances of damage tiles.

Polished Marble Great Doddington before restoration

I was contacted by the property owners, who live in the quaint town of Great Doddington, about making the necessary repairs and also providing the complete restoration the floor had been in desperate need of for so long.

Polished Marble Great Doddington before restoration

As the property owners were due a holiday they trusted me with their keys; this turned out for the best as I was able to focus on clearing the area and carrying out the work without impacting them however it did mean I was under pressure to complete the floor in time for their return.

Cleaning and Repairing a Marble Tiled Floor

As you can see from the photographs (below), the floor appeared dull and ingrained with dirt – a deep clean was long overdue. Before I started I cleared the room was of all furniture, before brushing and vacuuming the surface of the floor to remove any dust and debris.

Then, to commence the first stage of the cleaning process, I used the Tile Doctor Burnishing pad system to polish out any light scratches and surfaces stains. I started by applying the Coarse red pad with a little water for lubrication, followed by the Medium blue pad and then the Fine yellow pad to refine the polish even further.

Next, I paid special attention to the dirty grout lines, cleaning then manually with a combination of hand brushes and Tile Doctor Pro Clean, a high alkaline cleaner that works well for removing soil buildup on a wide range of natural stone floors. The areas I cleaned came out really well, and were then dried with fans before I began the repairs.

As the cracks in the tiles were caused by settlement issues, I opted to use a flexible grout to fill them. The grout used was Jasmine in colour to best match the natural colour of the tiles. I mixed it with water and then applied it to the cracks with a trowel, before allowing it to dry for roughly an hour and then wiping of any excess. There were so many cracks and small holes to deal with that I used bits and pieces of equipment to mark where I had carried out the repairs as some can be hard to see once dry!

Repairing a Polished Marble Stone Floor

Sealing a Marble Tiled Floor

I returned to the property the following day to perfect the polish on the floor and seal the tiles to protect against further damage and dirt. I used the Very Fine green burnishing pad (the final of the four pad burnishing system) along with a small amount of water to finally bring these tiles back to their natural level of shine. This also helped to further blend in the repairs by removing any remaining excess filler.

My choice of sealer was Tile Doctor Colour Grow, an impregnating sealer that is a favourite for high end Marble and Limestone floors since it really enhances the natural shades in the stone. Additionally, by penetrating deep into the pores of the stone Colour Grow will provide the durable protection against ingrained dirt and stains that this floor had been lacking for a long time.

Polished Marble Great Doddington after restoration

The appearance of this Marble floor was completely transformed, ready for the customers to enjoy when they arrived back form their holiday. Quite often people suffer from so-called ‘holiday hangovers’, but no doubt these customers continued to relax, enjoying their newly restored Sun room and kitchen.

Polished Marble Great Doddington after restoration

Marbled Tiled Floor Restoration in Northamptonshire

Marble Tiled Sun Room and Kitchen Transformed in Great Doddington Read More »

Black Marble in Brackley During Polishing

Putting the shine back on a Black Marble Floor in Brackley

This customer from the town of Brackley near Northampton got in touch with us to discuss their lovely black Marble tiled floor where it was proving difficult to maintain the shine. I went to visit and after carrying out some tests and asking a number of questions it became clear that that the product that had been used for regular cleaning had a high alkaline detergent content which was not suitable for the floor and had been causing smears, there were also light scratches due to the soiling levels. For polished stone or sealed floors we always recommend a neutral PH cleaning product such a Tile Doctor Neutral Cleaner.

Black Marble in Brackley Before Polishing

Burnishing Polished Black Marble Tiles

To remove the light scratches and restore the shine on the Marble it was necessary to cut back the surface and re-polish with a set of burnishing pads. The pads come in a set of four and are applied in sequence starting with a coarse pad together with a little water to cut through the old sealer and grime. You then progress through the other finer pads one by one until you get to the final polishing pad which provides a high polish.

Black Marble in Brackley During Polishing

After polishing the floor was rinsed down to remove any slurry from the polishing process and then allowed to dry before sealing with Tile Doctor Colour Grow which impregnates the pores in the stone enhancing the natural colours and protecting it from future staining.

Black Marble in Brackley After Polishing

Before leaving we spoke again on the types of cleaning solutions to get the best results and she was over the moon with the results.

Maintaining Polished Black Marble Tiles in Northamptonshire-

Putting the shine back on a Black Marble Floor in Brackley Read More »

Noce Marble During Sealing Oundle

Cleaning and Sealing Noche Marble Tiled Hallway in Oundle

These Noche Marble tiles installed in the hallway of this house in Oundle are a premium product with a warm antique look however like any natural stone tile it needs to be sealed in order to prevent dirt becoming ingrained in the pores of the stone. In this case the sealer had worn off and was the floor was now difficult to keep clean so we were called into the deep clean the tile and grout and then re-seal. Sealers can last a few years depending on wear.

Noce Marble Before Cleaning Oundle Noce Marble Before Cleaning Oundle

Cleaning Noche Marble Tiles

To deep clean the tile and grout and remove any remaining sealer I combined a strong dilution of Tile Doctor Pro-Clean 50/50 with NanoTech UltraClean. The UltraClean adds tiny abrasive particles which make a more effective cleaning product, both products are safe to use on natural stone floors. It’s best to let the solution soak into the tile for ten to twenty minutes before being scrubbed in with a rotary machine fitted with a scrubbing brush or black scrubbing pad. The rotary pads can struggle to get into the grout lines so it’s best to use a stiff brush along those.

Noce Marble During Grout Cleaning Oundle
To remove the soiled cleaning solution and rinse the tiles I use a high pressure spinner tool which is a brilliant machine for tile cleaning as it deploys water under high pressure water whilst extracting the dirty water back to a container in the van.

Noce Marble After Cleaning Oundle Noce Marble After Cleaning Oundle

Sealing Noche Marble Tiles

The floor was left to dry out for a few days and we returned the following week to seal the tiles using a damp meter first to verify the floor was indeed dry which it was so we proceeded to seal the tiles using two coats of Tile Doctor Colour Grow.

Noce Marble During Sealing Oundle
Colour grow was chosen as it’s an impregnating sealer the soaks into the pores of the tile bringing out and enhancing the natural colours in the stone in the process.

Noce Marble After Sealing Oundle Noce Marble After Sealing Oundle

I took lots of photographs so you should be able to see how much cleaner the floor now looks, especially the grout and how the colour has been restored to the Marble.

Noche Marble Floor Tiles Cleaned and Sealed in Northamptonshire

Cleaning and Sealing Noche Marble Tiled Hallway in Oundle Read More »

Marble Tiled Floor In Irthlingborough after cleaning

Polished Marble Floor Covered in Grout Haze in Irthlingborough

These photos are from a newly installed Polished Marble floor in the kitchen at a residence in Irthlingborough Northants which had been left covered in grout haze. The customer called the builder back as they were unhappy with the finish but he could not rectify the problem, so the customer contacted Tile Doctor to see if anything could be done.

This is a problem we often come up against where a builder or tiler does a good job of laying the tiles but for some reason doesn’t remove all the grout from the tile and we have even seen some jobs where the grout smears have been sealed over which makes it even more noticeable especially on a polished floor. Fortunately for the customer we are able to resolve such problems and after agreeing the process we set about solving the problem.

Marble Tiled Floor In Irthlingborough before cleaning

Burnishing Polished Marble Tiles

To protect the kitchen units from any splashing etc. all the kick boards were removed and plastic sheeting fitted to protect new doors and panels before any work was undertaken.

Polished Marble is a very hard surface that has to be burnished with diamond encrusted pads to restore the finish so we set about this task using a set of Tile Doctor Burnishing Pads. The pads come in a set of four, you start with the coarse pad together with a little water and this cut’s through and removes surface grime, surface seal and in this case grout haze as well. You then progress through the other finer pads one by one until you get to the final polishing pad which provides a high polish. The pads did the trick and had the surface polished to a high shine which was the look the customer was hoping they would have had in the first place.

The floor was looking great but I was concerned about the grout, most people don’t realise but the top layer of grout is actually slightly porous and will attract dirt and discolour over time, this is especially the case in a bathroom or kitchen. After discussing this with the customer we sealed the grout with Tile Doctor Ultra-Seal which provides a natural look whilst preventing contaminates reaching the grout.

All in the job took two days and the customer was extremely happy with the final result.

Marble Tiled Floor In Irthlingborough after cleaning
 

Cleaning and Polishing Marble Tiled floor in Northamptonshire

Polished Marble Floor Covered in Grout Haze in Irthlingborough Read More »

=================================

Northamptonshire Tile Doctor

================================= Read More »

Scroll to Top