Grout Clean-up

Quarry Tiled Kitchen Floor Renovation Wollaston

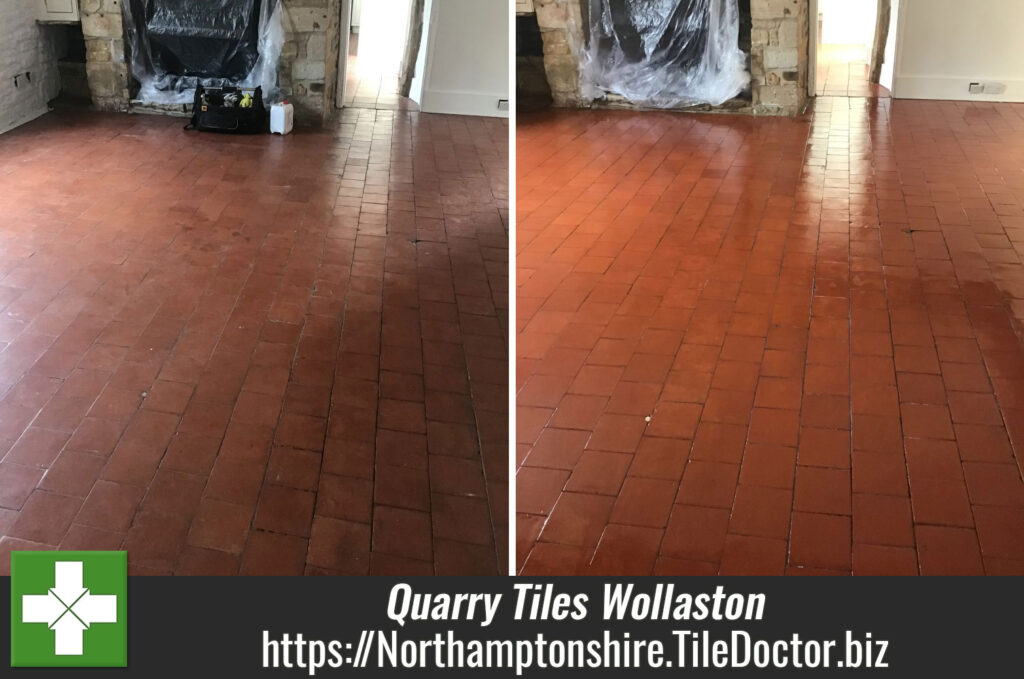
Dirty Quarry Tiled Floor Deep Cleaned and Sealed in Wollaston

This client from the village of Wollaston contacted Tile Doctor about cleaning and sealing their Quarry tiled floor. They were refurbishing the house and wanted to keep the original floor tiles as part of the renovation.

The tiles were installed throughout the ground floor, including the kitchen, lounge and hallway. However, as I was to discover myself, they were covered in years of grime, and they were not sure if they could be restored.
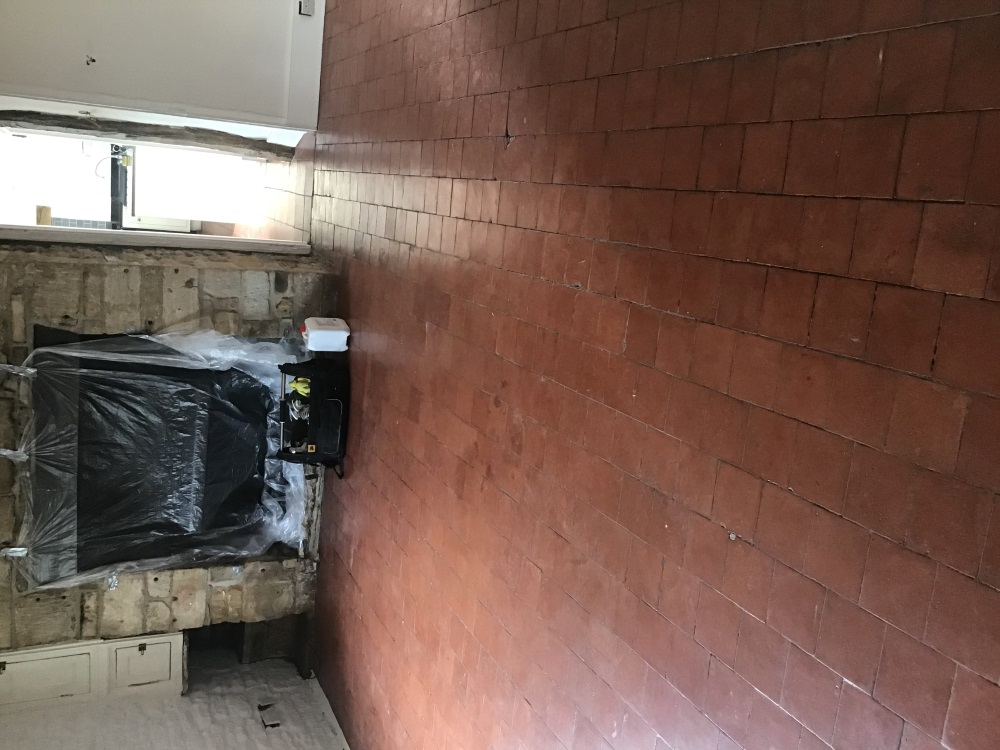
Quarry Tiled Kitchen Floor Before Renovation Wollaston

I went over to survey the floor and could see that any sealer that may have protected the tiles from ingrained dirt had long since worn off and as a result dirt had become ingrained into the pores of the quarry tiles. Once this happens its very difficult to keep clean.
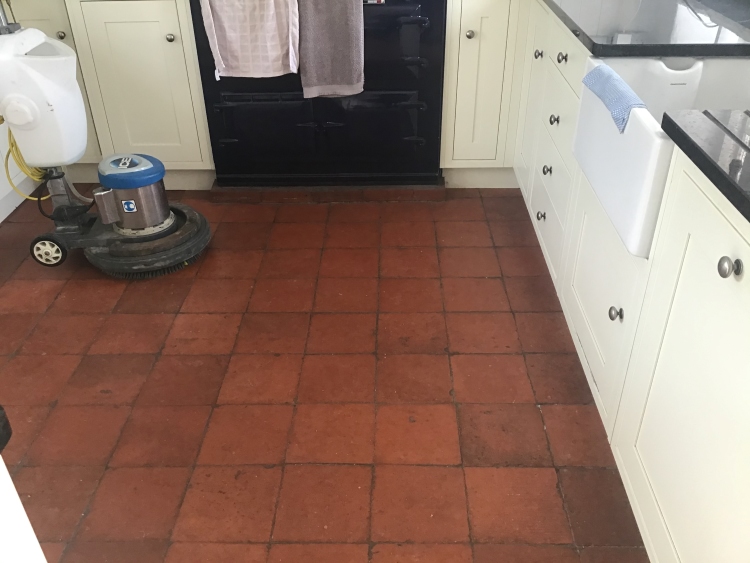
Quarry Tiled Kitchen Floor Before Renovation Wollaston

I had to agree the floor was overdue a deep clean and re-seal and so took some measurements in order to work out a quote for doing the work. The quote was accepted, and a date set for starting the work which would take two days, one to clean and one to seal.

Cleaning a Quarry Tiled Ground Floor

To deep clean the quarry tiles, a strong dilution of Tile Doctor Remove and Go was applied to the floor and left to dwell for a short while. The solution was then scrubbed into the tile using a black scrubbing pad fitted to a rotary machine.

The solution soon turned black with the dirt that was pulled out of the tiles and was rinsed away with water and extracted using a wet vacuum. I inspected the tiles afterwards and could see some paint splashes from years of decorating were still evident, so I re-applied the product and repeated the process to get rid of them.

The grout was then cleaned by hand using Tile Doctor Pro-Clean and a scrubbing brush, again extracting the waste once complete. I find this is the most effective way to clean grout as the pads struggle to reach into the recess of the grout line.

To complete the cleaning process, I then gave the floor an acid rinse with Tile Doctor Grout Clean-up, this was applied to remove old grout smears and further clean up the tiles. All soiling was rinsed off with water and extracted with a wet vacuum. The floor was left to dry off overnight.

Sealing a Quarry Tiled Ground Floor

Returning the following day, the first job was to test the floor with the damp meter to check it was dry. The tiles needed to be dry enough to accept the seal and applying sealer to damp tiles can result in a patchy appearance. This is always worthy checking when cleaning Quarry tiles as that are naturally quite porous so can take some time to dry.

Once satisfied the readings were within the correct range, I was ready to seal. I selected to use Tile Doctor Seal and Go Extra for this, it’s a breathable sealer which is useful for older floors such as this where there is no evidence of a damp proof membrane being installed. Breathable sealers allow for moisture to rise through the tile and evaporate at the surface, without this moisture can build-up under the floor causing it to reach out to the walls where it could cause rising damp.

I applied two coats of Seal and Go Extra waiting for the first to dry before applying the next. The sealer lifts the deep red colours in the Quarry tiles and adds a nice appealing shine. The sealer works by ensuring dirt remains on the surface where it can easily be cleaned away.
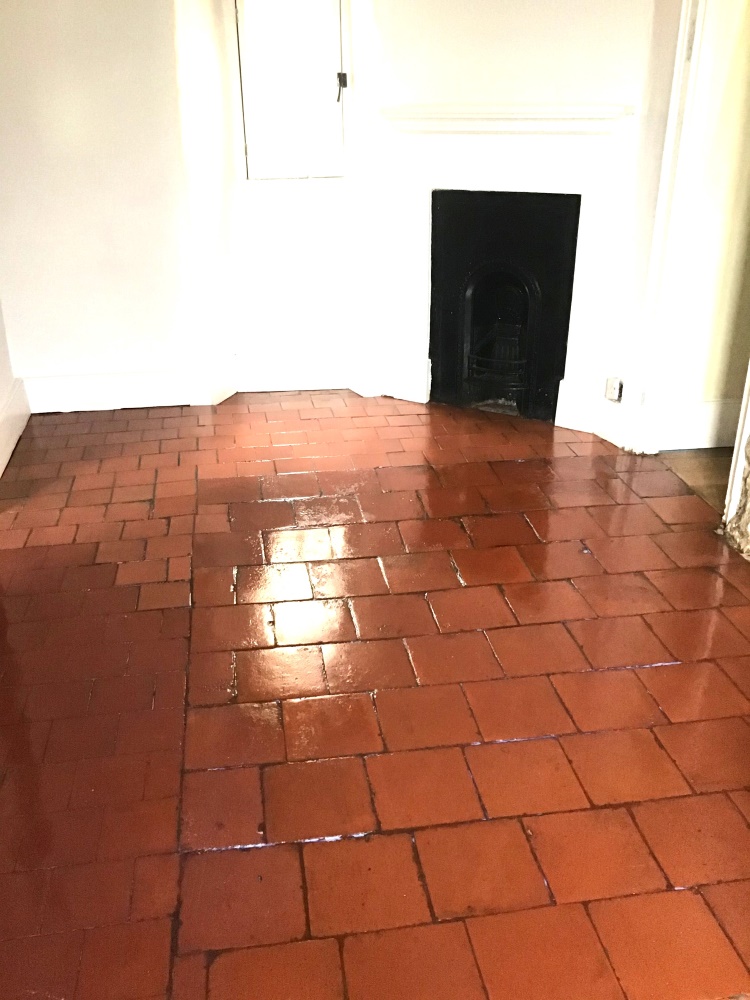
Quarry Tiled Kitchen Floor After Renovation Wollaston

My client was very happy with their now clean quarry tiled floor and left the following feedback for me:

“I was looking forward to the results before it was even booked in, and I was not disappointed. A professional approach and very helpful throughout.”

Before leaving I took time to explain how to maintain the floor using Tile Doctor Neutral Tile Cleaner. Its important to use a product like this on a sealed floor as many tile cleaning products are simply too strong and will strip the sealer off the floor with regular use.
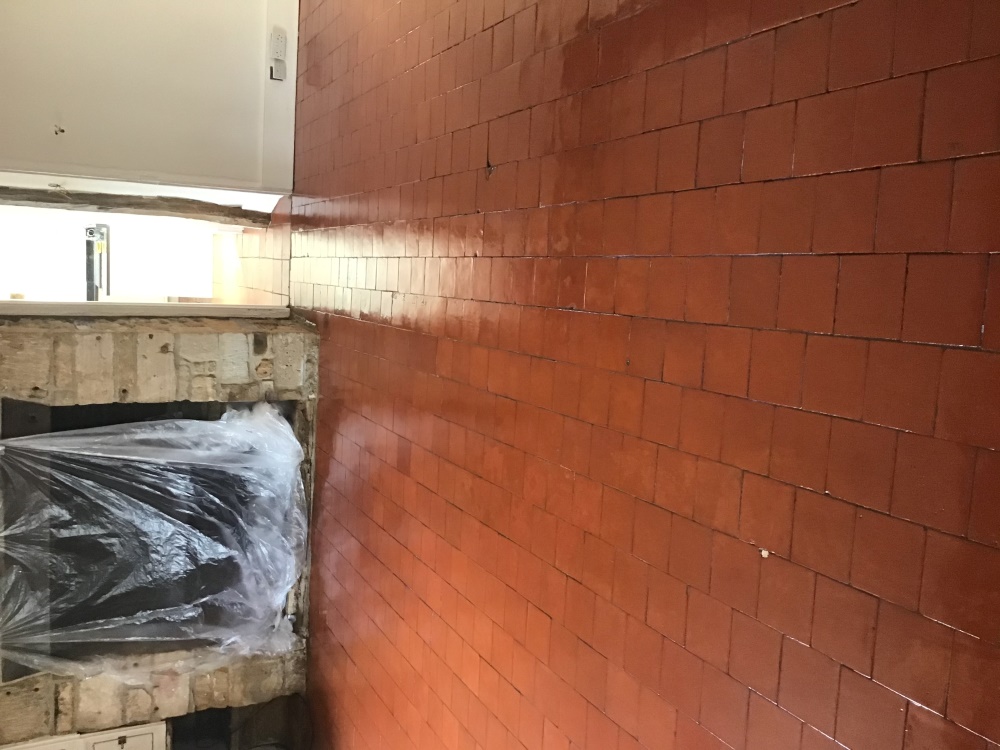
Quarry Tiled Kitchen Floor After Renovation Wollaston


Professional Cleaning of a Quarry Tiled Floor in Northamptonshire

Dirty Quarry Tiled Floor Deep Cleaned and Sealed in Wollaston Read More »

Grout Haze Removed From Porcelain Floor Tiles Northampton

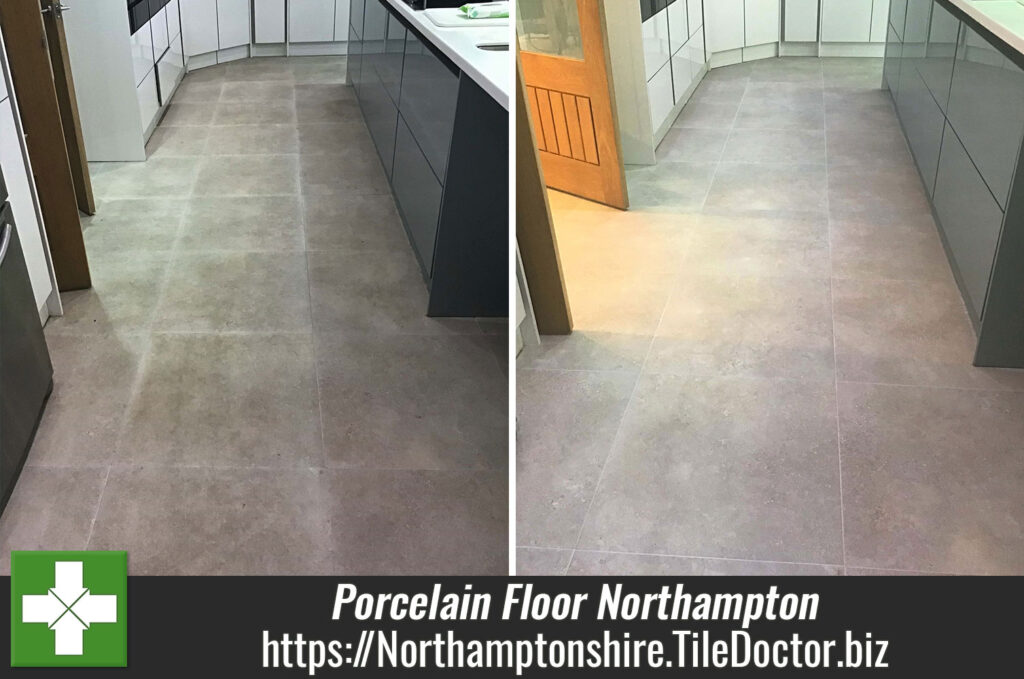
Removing Polymer Grout Haze following Porcelain Floor Installation in Northampton

This client from Northampton called contact me about their newly installed Porcelain tiles which appeared to be much darker than they remembered from in the shop. They were disappointed with their appearance and so I agreed a time to pop round, diagnose the issues and come up with a solution.

Grout Haze Before Removal From Porcelain Floor Tiles Northampton

Once at the property I quickly established after testing a couple of tiles that there was grout haze over the entire area from installation. This happens when the grout starts to dry on the tile before it is cleaned and fully rinsed off. This problem was compounded by the customer vigorously mopping the floor with several different products trying to resolve this issue themselves and the product building up and attracting more soil to the areas, therefore darkening it further.

Grout Haze Before Removal From Porcelain Floor Tiles Northampton

The test clean I conducted removed the grout haze to reveal the tile they had been originally expecting. Impressed with the results from the test they asked me to repeat the process on the whole floor which included the kitchen and adjoining dining area. I worked out a quote which was agreed and a date scheduled for my return.

Removing Grout Haze from a Porcelain Tiled Floor

Fortunately, the owner knew which grouting product was used when laying the floor, this was very useful as polymer-based grouts need a different approach to traditional grouts. As it turns out it was a polymer-based grout which makes sense as they are known to set faster and cause this problem as a result.

The process I used was to apply Tile Doctor Remove and Go to a workable section of the floor which was approximately 8m2. The solution was allowed to dwell for ten minutes or so prior to agitating with a rotary brush machine. This area was then rinsed off with water and a wet and dry pick-up machine. This process is used to break down the polymers in the grout but does not fully remove the haze from the tiles, that is covered in the next section.

Part two of treating the grout haze involves the application of Tile Doctor Grout Clean-Up to the tile and allowing it to dwell for a further ten minutes, a black buffing pad is then used with the rotary machine to scrub the product into the Porcelain tile. As before the soiled solution is removed with another rinse and extracted with the wet and dry pick-up machine.

Once that was done, I inspected the floor to ensure all the grout haze has been removed and repeated the 2nd stage process where required.

Sealing a Porcelain Tiled Floor

I allowed the floors to dry off overnight and returned the following day to apply Tile Doctor Ultra Seal Sealant over all the areas, this is especially good for protecting the grout lines from staining.

Grout Haze After Removal From Porcelain Floor Tiles Northampton

Given the dark colour of the Porcelain tiles it’s difficult to appreciate the improvement from the photographs, my customer was extremely happy with the result though and left the following glowing review:

“Fabulous service from Phil and great results really really pleased. Lovely man and very hard working. Thank you”

Before leaving I made sure to discuss aftercare cleaning, which for this floor I recommend using Tile Doctor pH Neutral Tile Cleaner which is a gentle but effective cleaning product designed for use on sealed tile and stone.

Grout Haze After Removal From Porcelain Floor Tiles Northampton


Porcelain Tile Cleaning in Northamptonshire

Removing Polymer Grout Haze following Porcelain Floor Installation in Northampton Read More »

Ceramic Tiled Floor Before After Tile Grout Cleaning Burton Latimer

Ceramic Tile and Grout Deep Cleaned in a Burton Latimer Kitchen

This customer from Burton Latimer near Kettering was having a new kitchen fitted which would have a different layout to the original. The Ceramic tiled floor was wall to wall and they wanted to see if the tiles could be renovated rather than having to replace them.

Ceramic Tile and Grout During Cleaning in Burton Latimer Kitchen Floor

I attended the customers property to inspect the floor and carry out a test clean on one of the dirtiest ceramic tiles and adjacent grout. The tiles were in a fairly grubby condition and the grout was black with dirt which happens a lot with Ceramic tiled floors. This is due to the ceramic tile being impervious and so the dirt from the tile becomes washed into the grout lines during cleaning.

Ceramic Tile and Grout During Cleaning in Burton Latimer Kitchen Floor

I carried out the test clean which went well and my customer was impressed; keen to proceed and happy with my quotation the work was booked in. The renovation was scheduled for the day after the old kitchen was removed and before the new kitchen was installed the following week.

Deep Cleaning Ceramic Tile and Grout

To deep clean the tile and grout a strong 1:3 dilution of Tile Doctor Pro-Clean and warm water was applied to the floor with a pump-up sprayer. The solution was allowed to dwell for several minutes before being worked into the grout using a stiff brush. This was followed up by agitating the solution into the rest of the floor with a rotary floor scrubbing machine fitted with a stiff brush attachment.

Working in sections and removing slurry with a wet pick-up machine. The next process was to apply Tile Doctor Grout Clean-up to all grout lines for a second clean to remove as much stubborn staining as possible. Again, this was worked into the grout with stiff grout brushes. Following this I went over the floor again with a black scrubbing pad attached to the rotary machine. The machines solution tank was filled with water to help lubricate the process and neutralise the floor.

Finally, all the excess water was removed with a wet pick-up machine and the floor was left to dry off overnight.

Sealing Grout on a Ceramic Tiled Floor

I returned the following day to seal the grout, Ceramic tiles won’t take a sealer and as mentioned earlier its best to seal the grout so the dirt remains on the surface and doesn’t get trapped in the rough grout.

After confirmed the floor was dry, I carefully applied Tile Doctor Ultra-Seal to the grout lines using a pipette and then wiping off any excess afterwards.

Ceramic Tile and Grout After Cleaning in Burton Latimer Kitchen Floor

Once done the floor looked new and my client was happy with result, it was a good decision and even more so when you consider the money saved in comparison to replacing the floor.

Ceramic Tile and Grout After Cleaning in Burton Latimer Kitchen Floor


Deep Cleaning Ceramic Tile and Grout in Northamptonshire

Ceramic Tile and Grout Deep Cleaned in a Burton Latimer Kitchen Read More »

Victorian Tiled Hallway Restoration Irthlingborough

Victorian Tiled Hallway Repaired and Restored in Irthlingborough

The following photos show a period Victorian floor in Irthlingborough which is close to Rushden and Wellingborough. Our client had discovered the floor after lifting a carpet that had been down for over a decade, the tiles had been stained with bitumen, which I assume was used as an adhesive, and she was keen to find out if it could be restored to its original condition.

Victorian Tiled Floor Before Restoration Irthlingborough

I attended the property to survey the floor and could see as well as the bitumen there were loose tiles in a couple of areas by the doorway that would also need looking at. Fortunately, I was able to reassure her that I could remove the bitumen residue and resolve the loose tiles and provided a quotation via e mail a few days later. Pleased the issues could be resolved the quote was accepted and we agreed a date for the work to be carried out.

Victorian Tiled Floor Before Restoration Irthlingborough

Cleaning and Repairing a Victorian Tiled Hallway Floor

After unloading my equipment, I taped up the skirting boards and doors to protect them. Next, I began by applying a coatings remover called Tile Doctor Remove and Go along the edges of the floor and allowed it to dwell for five to ten minutes to break down the bitumen, this was then agitated by using brushes, before rinsing with a wet vacuum pick up machine.

Once all the edges were cleaned, I started scrubbing the floor working in sections of two to three square meters using a 17” black scrubbing pad attached to a rotary floor machine. I worked back towards the front door working the Remove & Go into the tiles. This system released most of the dirt, staining and bitumen out of the Victorian tiles to the surface where it could be removed with a wet vacuum.

I then attached a coarse 200-grit burnishing pad to the rotary scrubbing machine and began working over the entire area adding a little water at each stage. This process removed the remaining bitumen and staining and gave the tiles a new lease of life. Again, the soiling was removed with the wet vacuum.

Repairing Victorian Hallway Tiles

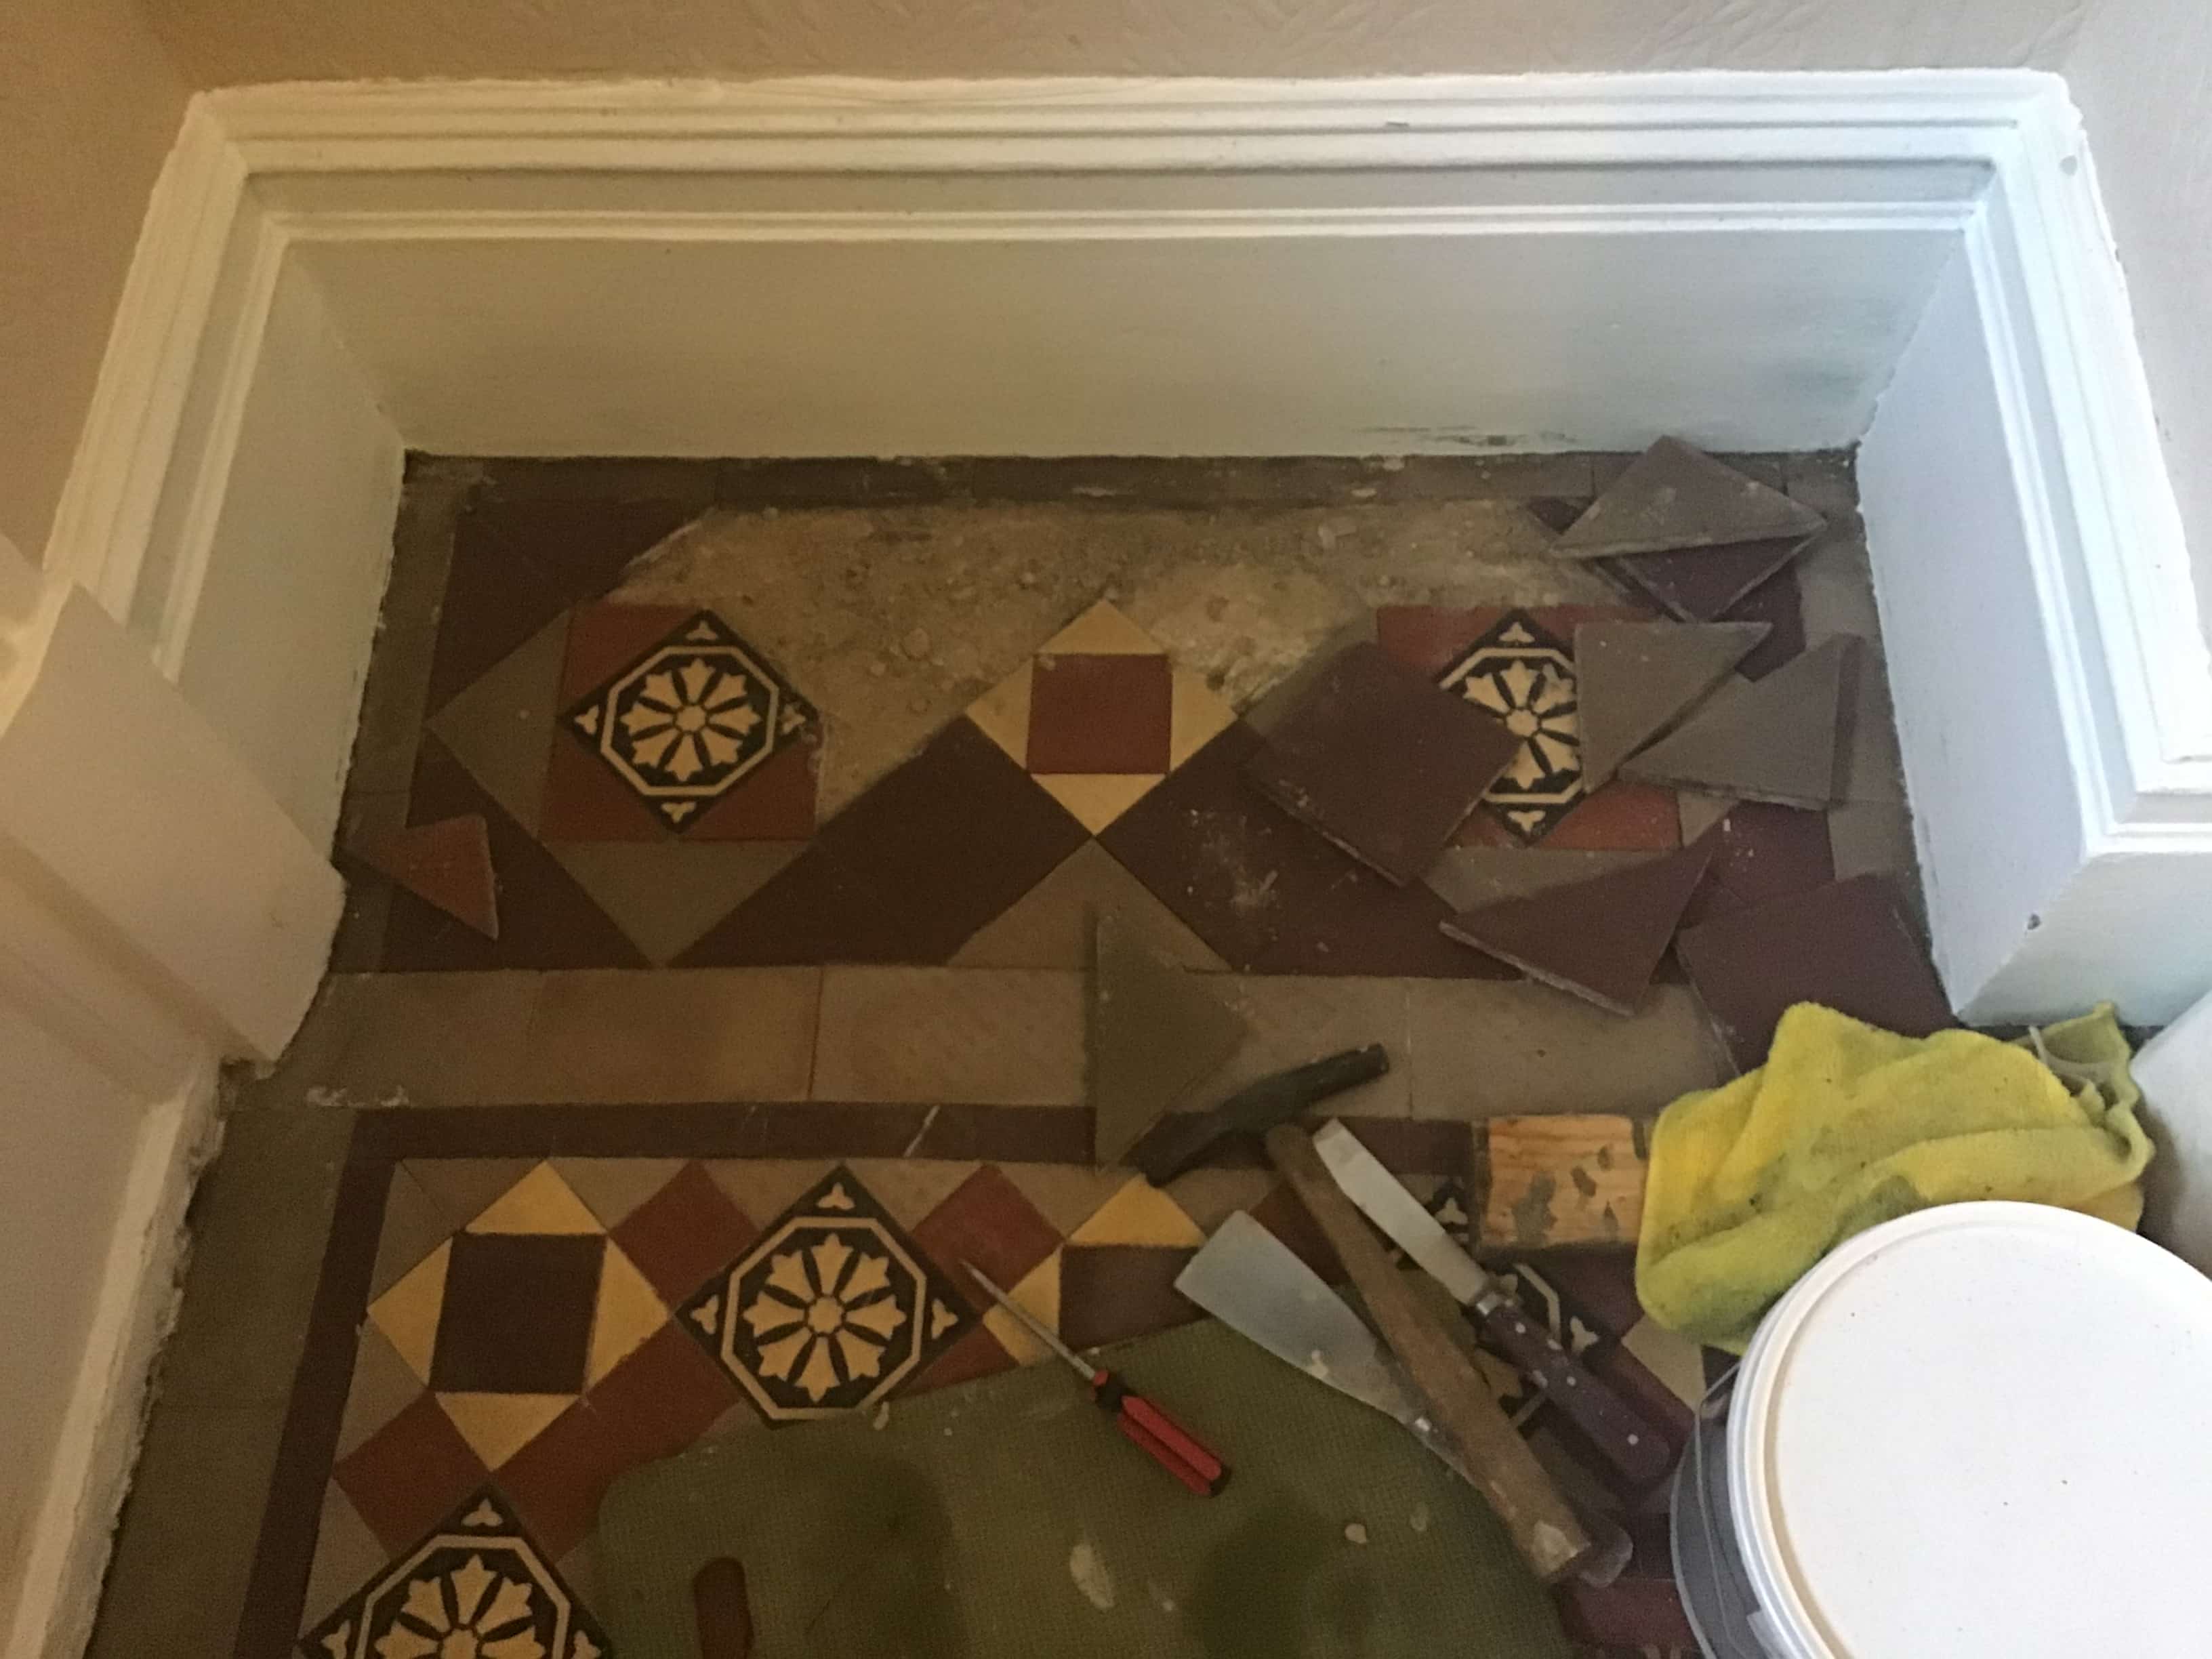
Once the area was clean, I was able to commence work on the repairs. As you can see from the photos there were 2 areas of approximately 18″ x 10″ where the subfloor had moved, and all of the tiles needed to be lifted so it could be repaired.

Victorian Tiled Floor During Restoration Irthlingborough

The sub floor was then broken up, removed, and replaced with a new cement screed level with the original base.

Victorian Tiled Floor During Restoration Irthlingborough Victorian Tiled Floor During Restoration Irthlingborough

Once the screed had set, I was then able to relay the original tiles with the original pattern and regrout these sections to secure them in position.

Victorian Tiled Floor During Restoration Irthlingborough

Once the grout had gone off, I was able to finally give these areas a clean using Tile Doctor Grout Clean-up to remove any residue and grout smears before the area was sealed.

Sealing a Victorian Tiled Hallway Floor

The hallway was then left to dry out for a couple of days, old floors like this one don’t have the benefit of a plastic membrane to protect them damp so it can take a while. Tiles need to be dry before sealing, otherwise the results can be inconsistent so it’s worth the wait.

Victorian Tiled Floor After Restoration Irthlingborough

When I returned the first task was to take a few moisture readings with a damp meter and check the repaired sections had set solidly. All was well so I started with the first coat of sealer which for this floor was Tile Doctor Colour Grow sealant which leaves a natural finish. This is a breathable sealant which is an important consideration for a floor without a damp proof membrane, being breathable it will allow moisture to pass from the sub floor and evaporate at the surface. A non-breathable sealer would effectively seal in the moisture which over time will build under the floor until it eventually reaches the walls causing rising damp.

Victorian Tiled Floor After Restoration Irthlingborough

The client was happy with the results and left the following positive feedback which is always appreciated.

“Philip did a very good job on our Victorian tiled hallway.”

Victorian Tiled Floor After Restoration Irthlingborough


Professional Restoration of a Victorian Tiled Hallway in Northamptonshire

Victorian Tiled Hallway Repaired and Restored in Irthlingborough Read More »

Terracotta Tiled Floor Renovation Towcester

Dirty Terracotta Floor Renovated in Towcester

This Terracotta tiled floor was installed throughout the kitchen, diner, and hallway of a cottage in the village of Towcester. You can see from the photographs on this page that the floor had not been properly maintained, the grout lines had turned dark with ingrained dirt and the whole floor was now well overdue a renovation.

Terracotta Tiled Floor Before Cleaning Towcester

My client liked the floor and its character but as he was going to the expense of fitting a new kitchen he wanted to know if the floor could be restored to its former glory as his wife wanted a high shine finish and an easy to maintain floor.

Terracotta Tiled Floor Before Cleaning Towcester

Renovating the Terracotta and Grout would involve completely striping the floor of any previous sealants, deep cleaning the tiles and then applying a fresh seal. They were happy for me to do the work and it was agreed that the best time for this to be carried out would be after the old kitchen had been removed and before the new kitchen units were fitted. This would allow for a uniform wall to wall finish, and it would also make my work easier as I wouldn’t have to navigate around the kitchen units.

Cleaning a Terracotta Tiled Kitchen Floor

To get the floor clean and remove previous sealers and coatings I applied a strong dilution of Tile Doctor Pro-Clean. I had tried a few products on the tiles and had discovered after conducting a few tests that this had the right impact when it came to removing the many layers of old sealant. Tile Doctor Pro-Clean has an alkaline formula which makes it ideal for cleaning natural products such as Terracotta.

Terracotta Tiled Floor During Cleaning Towcester

The Pro-Clean was left to soak into the tiles for ten minutes and then scrubbed into the floor using a 17” rotary floor buffer fitted with a black scrubbing pad and running at slow speed to reduce splashing. This activity soon brought the dirt out of the tiles and the now soiled cleaning solution was removed using a wet vacuum. The floor was then rinsed down with water and the process repeated a couple of times until I was happy with the results.

Terracotta Tiled Floor During Cleaning Towcester

To clean up the grout a stiff grout brush was run along the grout lines in combination with more Pro-Clean. There were a few stubborn stains on the floor, and these were removed by spot cleaning the affected area with another product called Tile Doctor Remove and Go employed with a steamer to lift the stain out of the clay tile.

Terracotta Tiled Floor During Cleaning Towcester

Once happy the floor was clean, the floor was given an acid wash using a using a 10:1 dilution of Tile Doctor Grout Clean-up. This final step in the cleaning produce removes old grout smears, alkaline salts that can lead to efflorescence and will neutralise the use of alkaline cleaning products used earlier.

Sealing Terracotta Tiles in Towcester

After more rinsing with water and extraction with the wet vacuum the floor was left to dry for four days before returning to seal the Terracotta. To achieve the desired glossy finish the Terracotta was sealed using Tile Doctor Seal and Go which is an ideal sealer for Terracotta and provides durable stain protection together with a silk finish. The more coats you apply the higher shine finish you are able to achieve depending on the porosity of the tile and in this case seven coats were applied.

Terracotta Tiled Floor During Sealing Towcester

The client was extremely impressed with the results achieved in the kitchen, diner and hallway and left the following 5-star feedback.

“Phil has done an absolutely outstanding job on our terracotta floor tiles. Made them look like new. Wonderful outcome. His attention to detail and professionalism are of an excellent standard. It was a pleasure to do business with Phil and we will definitely be calling on his services again in the future. He is a really nice bloke too. Thanks again Phil.”

Terracotta Tiled Floor After Sealing Towcester


Professional Restoration of a Terracotta Tiled Kitchen in Northamptonshire

Dirty Terracotta Floor Renovated in Towcester Read More »

Scroll to Top