Bathroom Tile Cleaning

Phil-Vissian-Northamptonshire-Tile-Doctor

Welcome to my Work History archive where you will find detailed examples of Bathroom Tile Cleaning and Renovation work carried out in Northamptonshire.

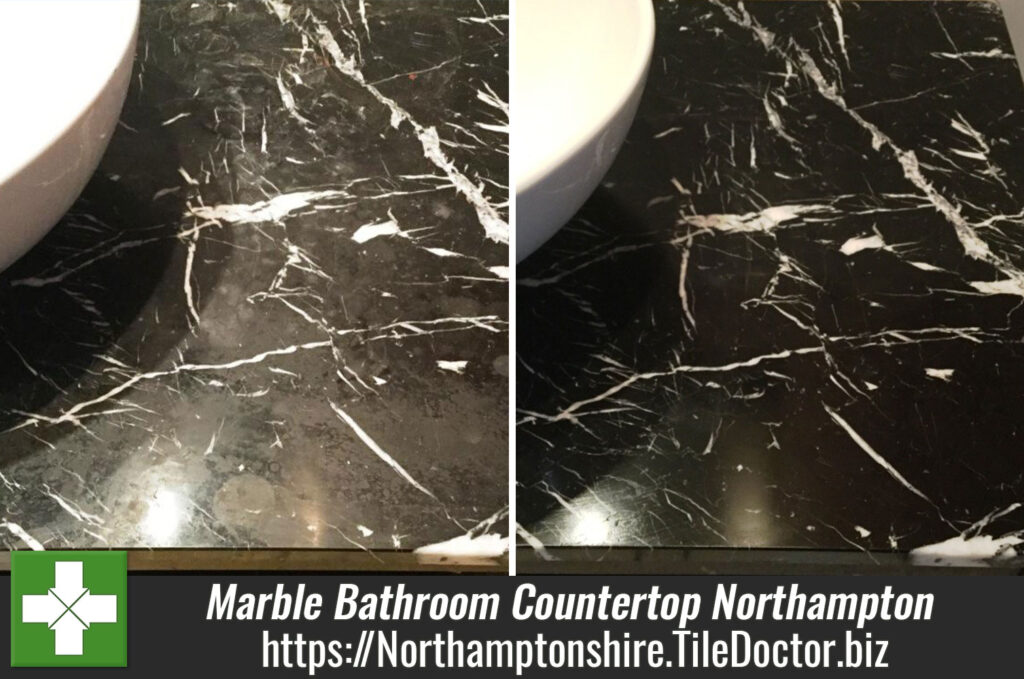
Damaged Marble Bathroom Countertop Polished and Sealed in Northampton

Damaged Marble Bathroom Countertop Polished and Sealed in Northampton

Marble is known for its premium quality, toughness and aesthetic, making it a very popular choice for bathroom countertops, such as this one at a house in Northampton. However just because it’s tough doesn’t mean that Marble can be cleaned with the usual household cleaners. Like all natural stone, Marble is acid sensitive and unsuitable products can have a very damaging effect on its appearance.

In this situation, the property owner had used a limescale remover to remove some unsightly marks from the countertop. Unfortunately, the product was acid-based and instead of making an improvement it just made it worse and caused severe etching.
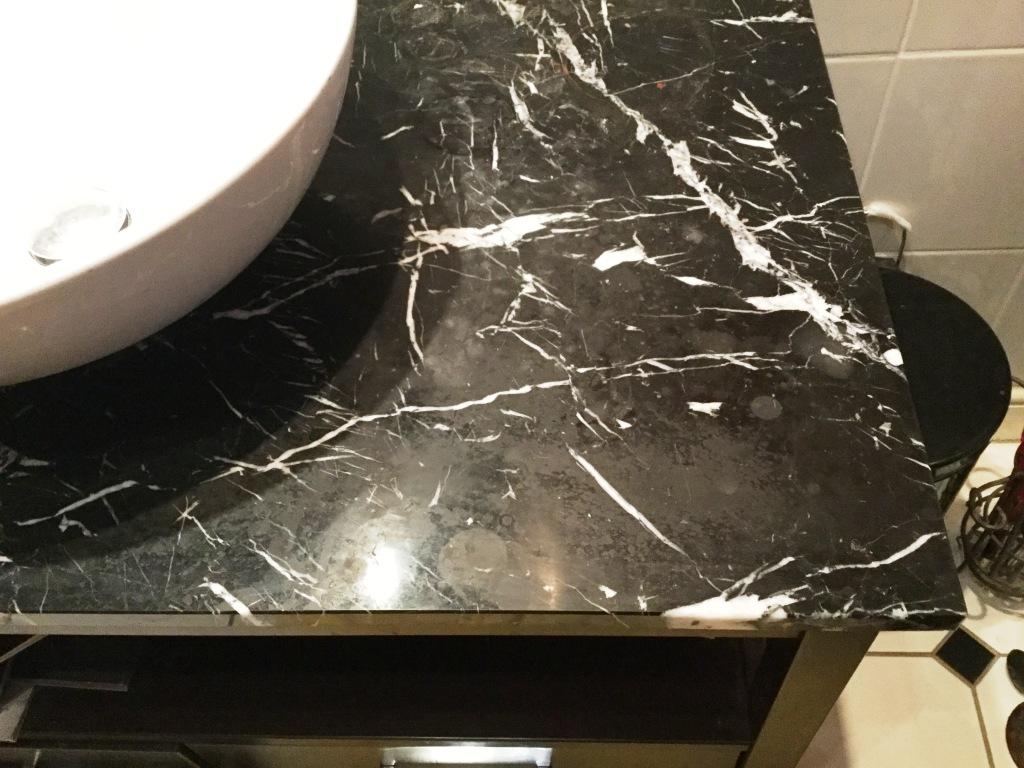
Black Marble Vanity Worktop Before Polishing in Northampton
The first photo above shows the limescale marks from where toiletries have been placed on the side whilst wet. Since Northampton is a hard water area, the limescale deposits over time caused these marks to appear.

Burnishing a Damaged Marble Bathroom Countertop

The only way to effectively remove the Limestone deposits – while at the same time rectifying the damaged caused by the botched cleaning attempt – was to use a system of hand-held diamond encrusted pads and hand help blocks of various grits to cut back the stone and re-polish it, a process we call burnishing.

Before officially beginning the burnishing process, I ran a few tests to determine the type of pad I would need to use to achieve the best results. I found that, in most areas, I would need to use the Tile Doctor 400 Grit (Coarse) pad to resurface the tile and remove the damaged layer of stone, but in some areas where the etching was worse, I would need to use the 200 Grit (Very Coarse) pad.

After burnishing the affected areas with the Coarse and Very Coarse grit pads, I started to incrementally polish the stone to achieve a high-quality shine, working my up through the Medium, Fine and Very grit pads.

Black Marble Vanity Worktop During Polishing in Northampton
No chemicals were used during this process – only water for lubrication, combined with the six-inch diamond encrusted burnishing pads fitted to a hand-held buffing machine.

Sealing a Marble Bathroom Countertop

The final part of the restoration was to seal the stone to maintain a long-lasting, deep polished appearance. To do this, I used Tile Doctor Shine Powder, which is a crystallising sealer in powder form. The powder is applied directly and combined with water, before being worked into the stone to seal it.
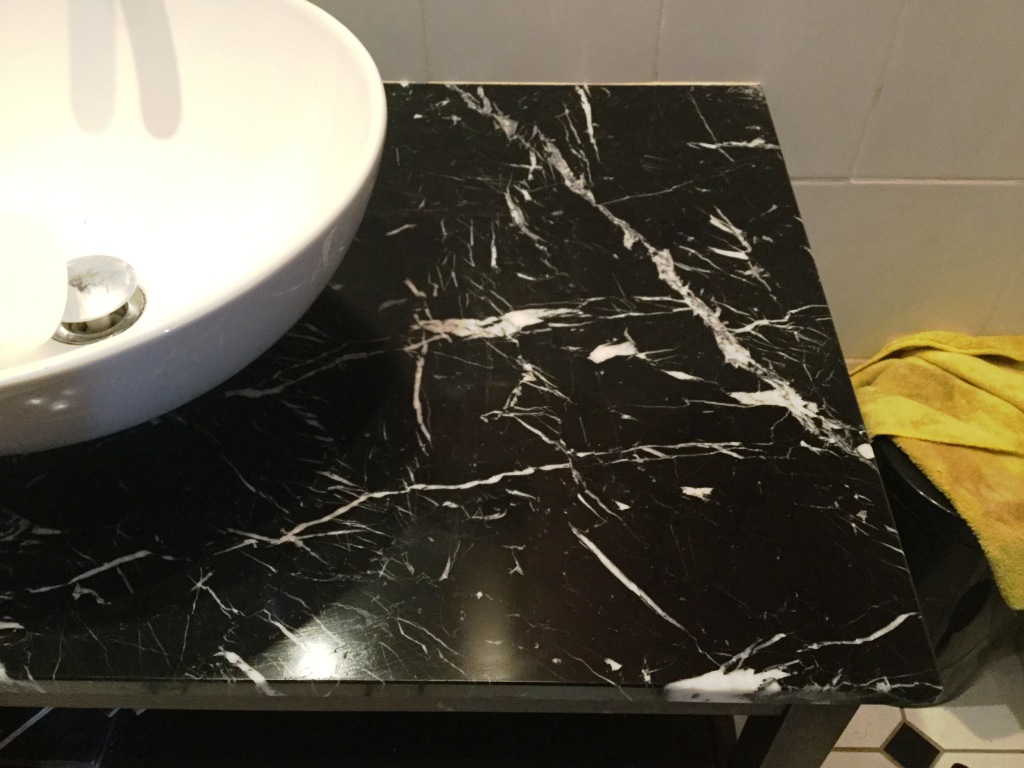
Black Marble Vanity Worktop After Polishing in Northampton
The customer was very happy with the results and the level of shine achieved. I gave the customer a complimentary bottle of Tile Doctor Stone Soap, which is our aftercare cleaner for polished natural stone, along with instructions on periodic maintenance to help maintain the finish we had achieved for as long as possible.

Removing Limescale Marks from a Polished Marble Countertop in Northamptonshire

Damaged Marble Bathroom Countertop Polished and Sealed in Northampton Read More »

Removing Limescale staining from a Black Limestone Shower Cubicle in Everdon

Removing Limescale staining from a Black Limestone Shower Cubicle in Everdon

Limescale deposits are a big problem in many parts of the UK where hard water is common. To remove it you need to use a strong acidic cleaner however what to do if you have limescale deposits on Limestone? As many may already know, Limestone is an expensive, high-quality stone that like a lot of natural stone is acid sensitive and can be damaged with the application of acid-based products.

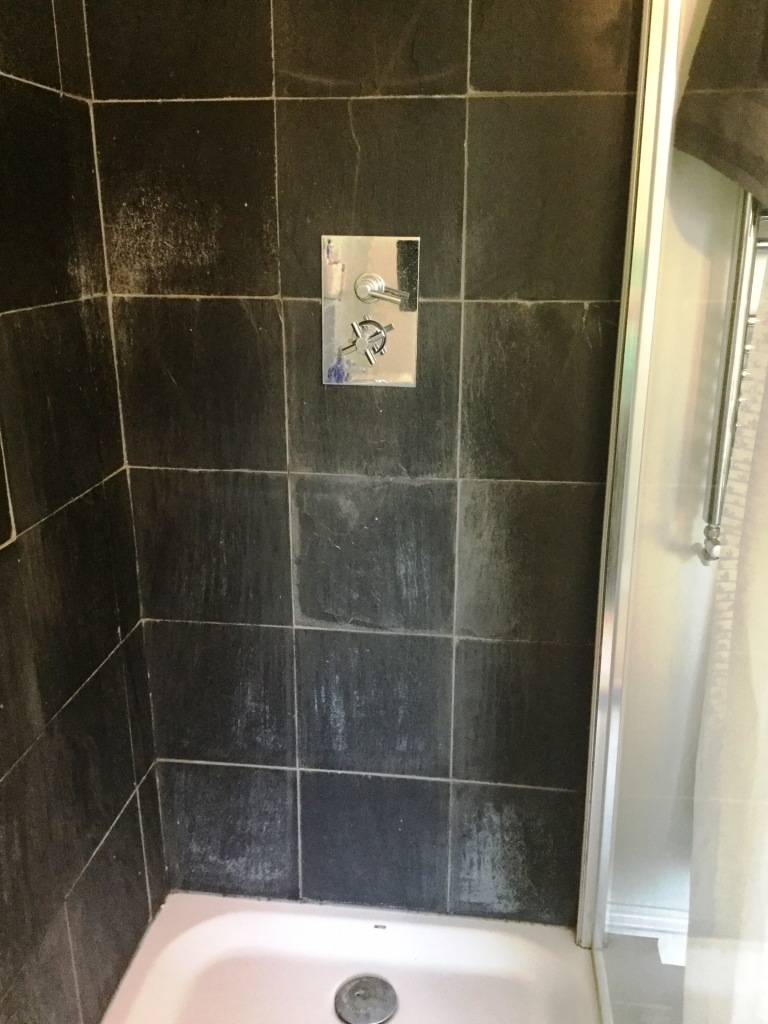
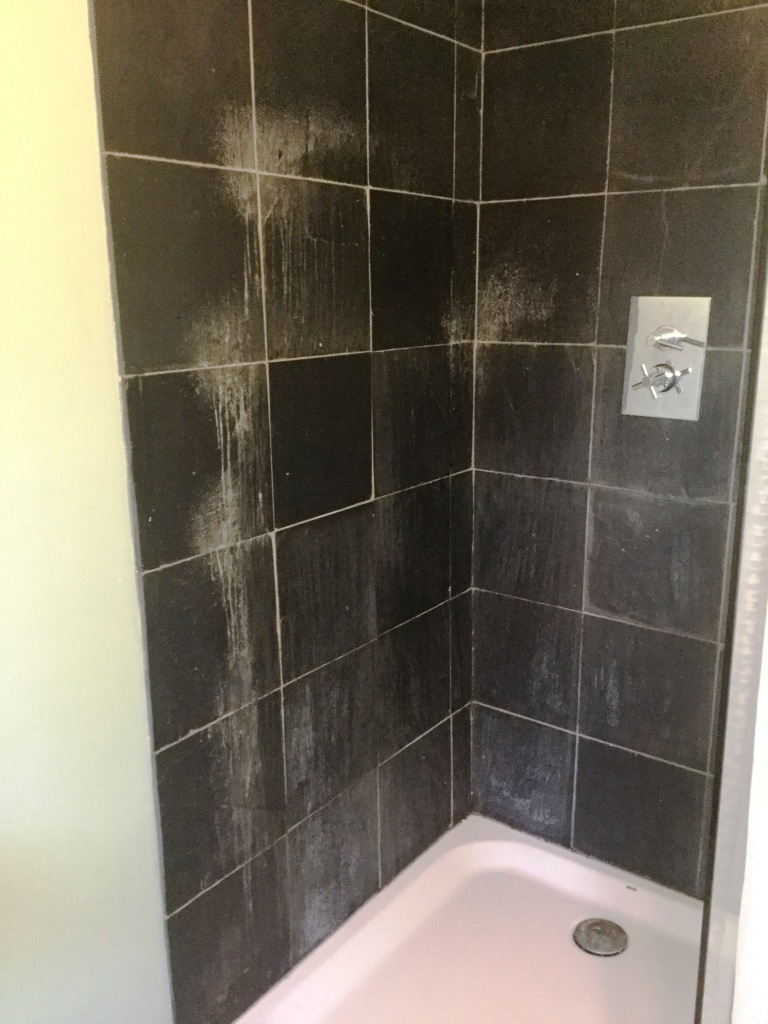
Black Limestone Shower Cubicle Before Cleaning Everdon Vilage
You can use acids on Limestone however if your careful and I demonstrated this recently at a property in this village of Everdon near Daventry in Northamptonshire. My customer had a fantastic black Limestone tiled shower cubicle that had been absolutely ruined by white limescale staining and it had reached the point where the situation simply couldn’t be resolved with standard cleaning products.

Black Limestone Shower Cubicle Before Cleaning Everdon Vilage

Cleaning and Burnishing a Stained Black Limestone Shower Cubicle

As the staining was so severe, I opted to use Tile Doctor Acid Gel to clean the tiles. This is a blend of phosphoric and hydrochloric acids in gel form and is the best product for cleaning vertical services, since water based products just run off and don’t have time to work on the staining.

Working in small areas, I carefully scrubbed the product into the stone and then rinsed it off with plain water. This process was repeated across the whole cubicle, reducing the stains significantly in the process.

Next, I used a handheld polishing machine fitted with 6” diamond encrusted burnishing pads, along with some water for lubrication, to polish and deep clean the stone, removing any stubborn stains remaining on the tiles.

Sealing a Black Limestone Shower Cubicle

I left the cubicle to dry completely overnight. Upon my return the next day, I proceeded to seal the tiles using two coats of Tile Doctor Colour Grow sealer.

This sealer is impregnating, meaning it fils the pores of stone to protect against ingrained dirt and staining. As well as providing stone protection, Colour Grow also enhances the natural colour in the stone – in this case, the deep black shades in the Limestone.

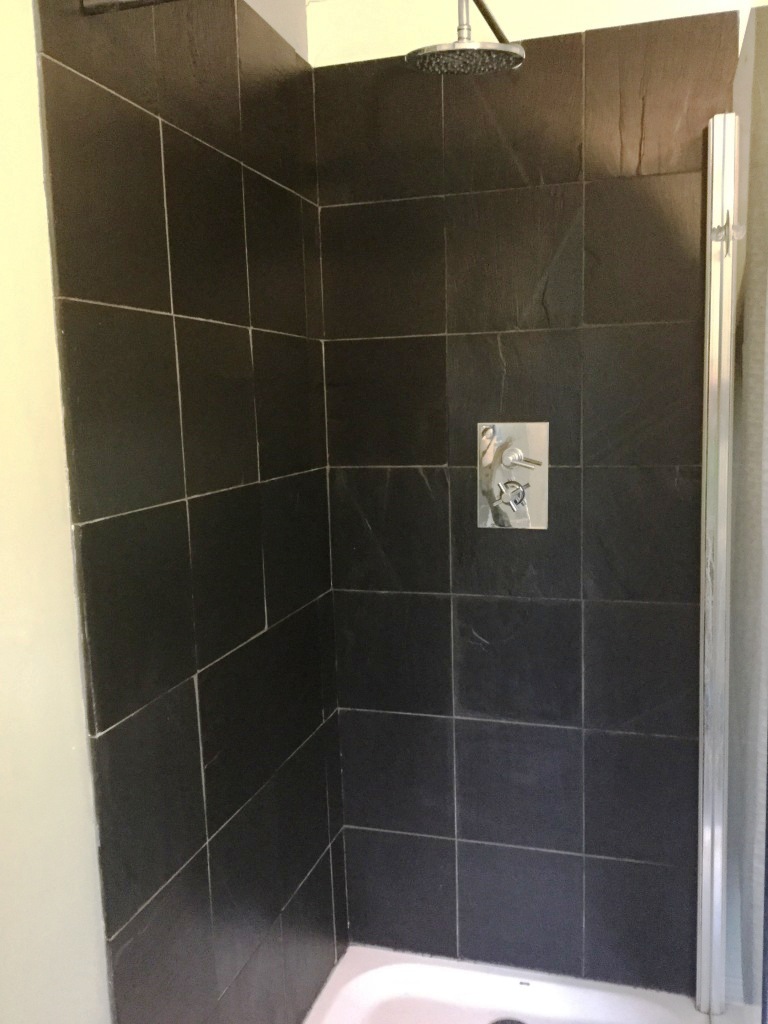
Black Limestone Shower Cubicle After Cleaning Everdon Vilage
Having finished the job, I gave the very happy customer some advice on keeping limescale and other staining at bay in future. I explained that proper maintenance can be conducted by simply rinsing the tiles with clean water after each use of the shower, and by using Tile Doctor Aqua-Pro tile aftercare cleaner at least once a week.

Black Limestone Shower Cubicle After Cleaning Everdon Vilage
 

Professional Limescale Removal from Acid Sensitive Stone in Northamptonshire

Removing Limescale staining from a Black Limestone Shower Cubicle in Everdon Read More »

Mouldy Shower Cubicle Refreshed in Northampton

Mouldy Shower Cubicle Refreshed in Northampton

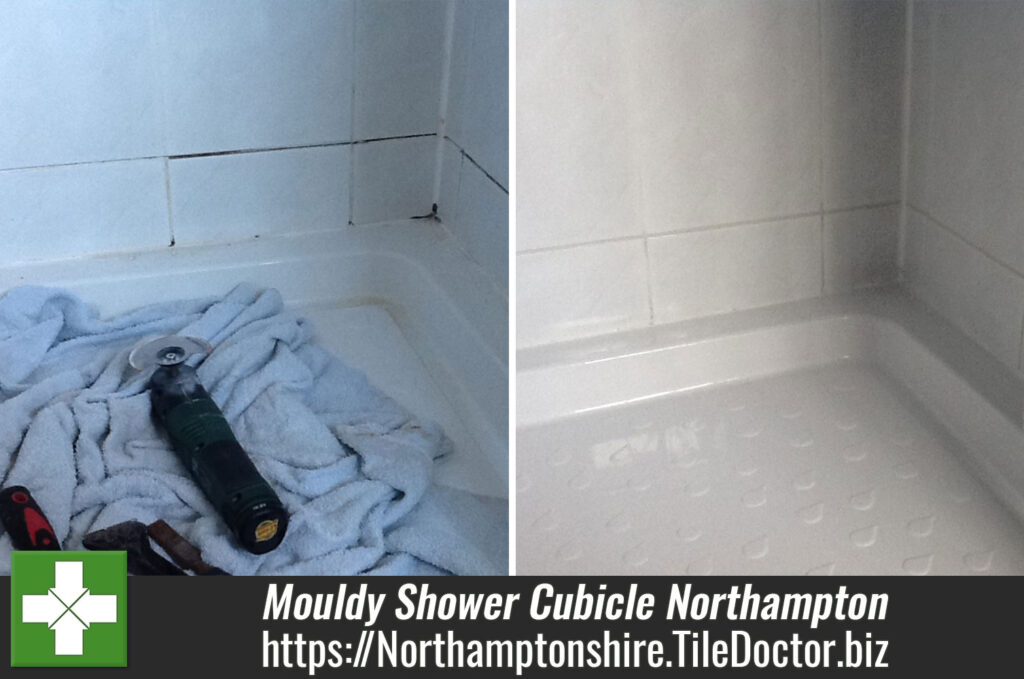
A common problem with bathroom and shower cubicle tiles is the appearance of mould on the tile, grout and silicone which if not tackled on a regular basis will spread and threaten to severely damage the appearance of the tiles, along with the silicone. This problem is usually due to inadequate ventilation however the good news is that with early intervention with Tile Doctor Mould Away spray the problem can be reversed.

The two photos below show a bad case of this very problem at a property in Northampton, where you can see that the grout and silicone sealant had become black with mould.

Mouldy shower cubicle before Northampton Mouldy shower cubicle before Northampton

Cleaning and Repairing Damaged Shower Cubicle Grout

Firstly, I decided to cut out the damaged grout with a hand held disc cutter and remove all the silicone at the base of the shower. To treat the less invasive mould in the rest of the cubicle I sprayed it with Tile Doctor Mould Away, which is specifically designed to remove mould from silicone and grout.

I sprayed the product onto the affected areas and left it to dwell for five minutes, before scrubbing it in with a stiff grout brush, resulting in a good clean. The area was then rinsed with plain water. Finally, I replaced the grout and the silicone that I had removed earlier with a flexible grout and a white silicone, both of which include a mould inhibitor.

Mouldy shower cubicle after Northampton Mouldy shower cubicle after Northampton

The photographs above show the end result. The customer was very happy with her refreshed tiles, and left the following feedback:

“Phil was brilliant – both when he came to look at the job and then when he returned to actually make the grout repairs. Most importantly he explained what was (and wasn’t possible) and did exactly what he said he would do. My shower area now looks brilliant and I’m no longer showering in fear of the tiles falling off the wall! Honest, clean, timely and totally professional. A tremendous job well done. Thank you.”

I left the customer with a bottle of Tile Doctor Aqua Pro to aid with regular cleaning. If used once or twice a week, this product will help maintain the condition of the grout. I also advised the customer that it is good practice to rinse the tiles down with plain water using the shower head after each shower to remove any soapy residue which can slowly discolour and stain grout over time.

Mouldy shower cubicle before and after Northampton
 

Professional Shower Cubicle Renovation in Northamptonshire

Mouldy Shower Cubicle Refreshed in Northampton Read More »

Diy Grout Cleaning Disaster After Colouring Alderton

Fixing a DIY Grout Cleaning Disaster in Alderton

I was recently called down to Alderton, a small village in the southern part of Northamptonshire most famous for housing the remains of a Norman Castle, known as ‘The Mount’. Unfortunately, this job involved remedying a bit of DIY grout cleaning that had not gone as expected.

As the first photo shows, my client had attempted to use a well-known household cleaning product to remove stains from the grout of his bathroom tiled floor which had not been sealed. Grouts are porous and, as a result, they can easily absorb grease and dirt, so it is understandable that my client would have wanted to try and clean them.

Diy Grout Cleaning Disaster Before Alderton
However, it is because of the porous properties of grout that the cleaning product did not remove the stains and, unfortunately, the stains were permanent. What’s more, the cleaning product itself had inflicted acid etching to the parts of the tiles where my client had scrubbed the grout.

Attempting to clean the stained grout

So what could be done to remedy the situation? My first action was to clean the grout using professional methods and products in an attempt to reverse the damage.

I did this using Tile Doctor 6″ twister pads, along with a hand-held buffing machine. The cleaning product I chose to use was Tile Doctor Grout Clean Up, which is designed to penetrate beneath the surface of the grout to lift out stains, smears and grout haze.

Diy Grout Cleaning Disaster After Cleaning Alderton
The final photo above shows the results of my attempts to clean the grout. Due to the extent of the damage, even a powerful cleaner like Grout Clean Up could not completely eliminate the stains completely. This meant that the only option left was to recolour the grout lines.

Recolouring the grout lines

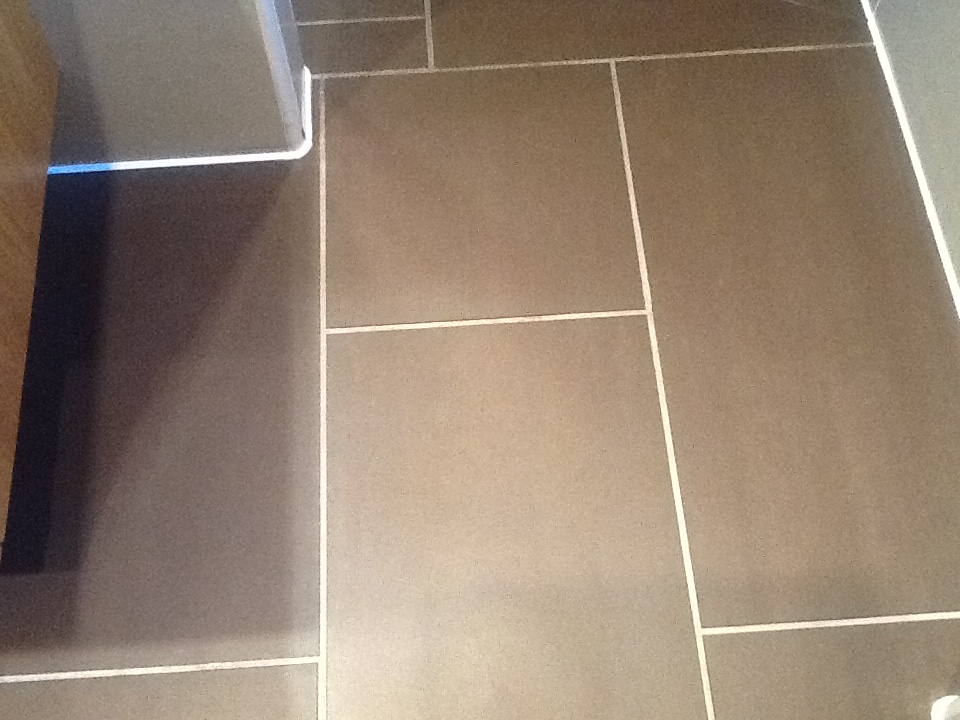
I recoloured the grout lines using a white Tile Doctor Grout Colourant. This product is a waterborne epoxy that not only recolours, but also seals the grout lines in order to protect against further stains in the future.

Diy Grout Cleaning Disaster After Colouring Alderton
I coloured all of the grout lines in the bathroom to ensure that everything matched, as well as to create an overall high-quality resilient finish. My client was very happy with results – she also remarked that she would not be letting her husband near the bathroom floor again.

Colouring Stained Grout in Northamptonshire

Fixing a DIY Grout Cleaning Disaster in Alderton Read More »

Ceramic Bathroom Tiles After Cleaning Kettering

Ceramic Tiled Bathroom Refreshed in Kettering

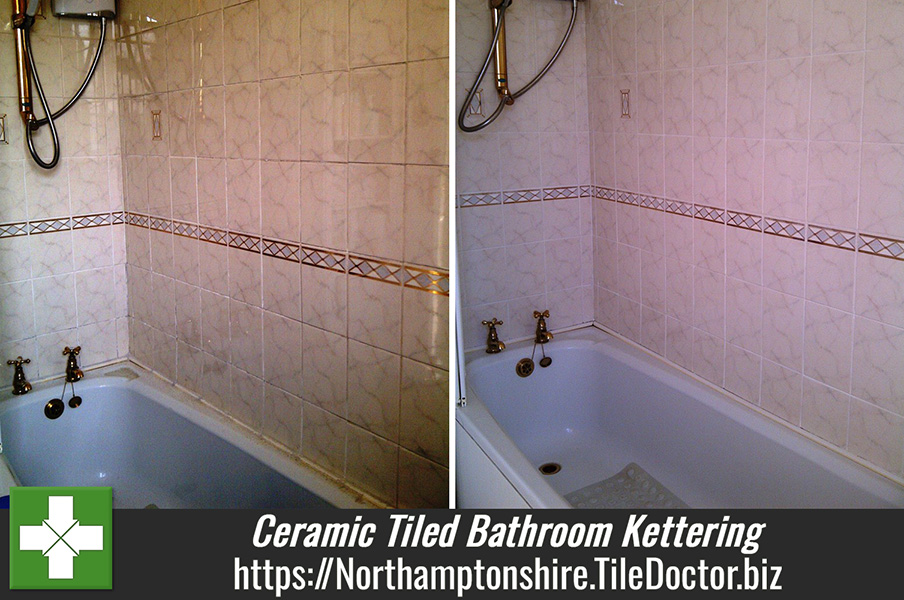
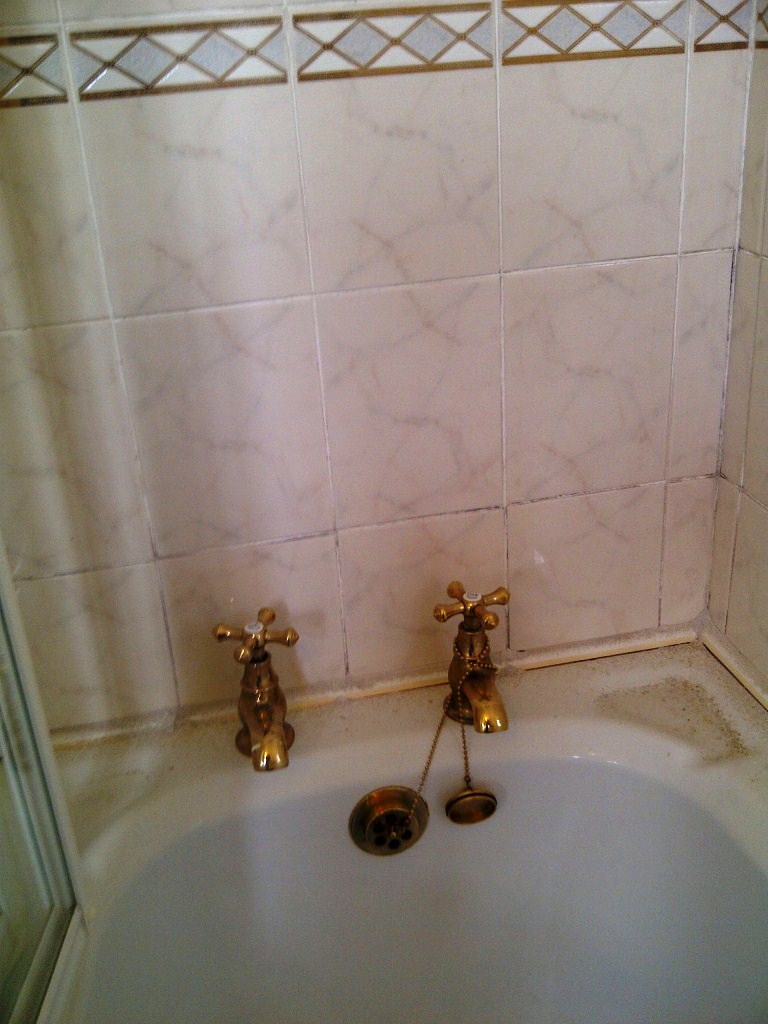
This was a straight forward request to rejuvenate the ceramic tile and grout around the bath at a house in the town Kettering. The glazed ceramic tiles where in good condition but the grout and seal around the bath had become quite grubby and stained with dyes from shampoos, soaps and had gone dark in some areas where mould had started to get a foothold.

Ceramic Bathroom Tiles Before Cleaning Kettering Ceramic Bathroom Tiles Before Cleaning Kettering

Cleaning Ceramic Tile and Grout

We started by spraying the tiles with Tile Doctor Oxy-Pro which is a strong high-alkaline cleaner especially formulated and packaged for cleaning showers. The spray delivery is important as mixing the cleaning product with air makes it lighter and helps it cling to the tile and grout. The Oxy-Pro was left to soak in for around 15 minutes before being scrubbed into the tile and grout using a stiff grout brush. This action cleaned up the grout and tile nicely removing stains from shampoos and soaps etc.

Removing Mould from Grout

The grout was looking much improved but there was however some evidence of mould remaining which needed dealing with. To tackle this we used Tile Doctor Mould Away which is designed to remove mould off Silicone and Grout. It’s very easy to use, you simply spray the Silicone or Grout to be treated with Mould Away then leave to soak in for twenty minutes and then scrub with a brush and rinse with water repeating the process until the mould has disappeared, in extreme cases you can leave it for a few hours but we didn’t need to do that.

Ceramic Bathroom Tiles After Cleaning Kettering Ceramic Bathroom Tiles After Cleaning Kettering

I was unable to use any tools on this job so it took a fair amount of manual effort but the results were well worth it as you can see.

Refreshing a Ceramic Tiled Bath in Kettering

Ceramic Tiled Bathroom Refreshed in Kettering Read More »

=================================

Northamptonshire Tile Doctor

================================= Read More »

Scroll to Top